
Grading Trousers Patterns
Deutsch

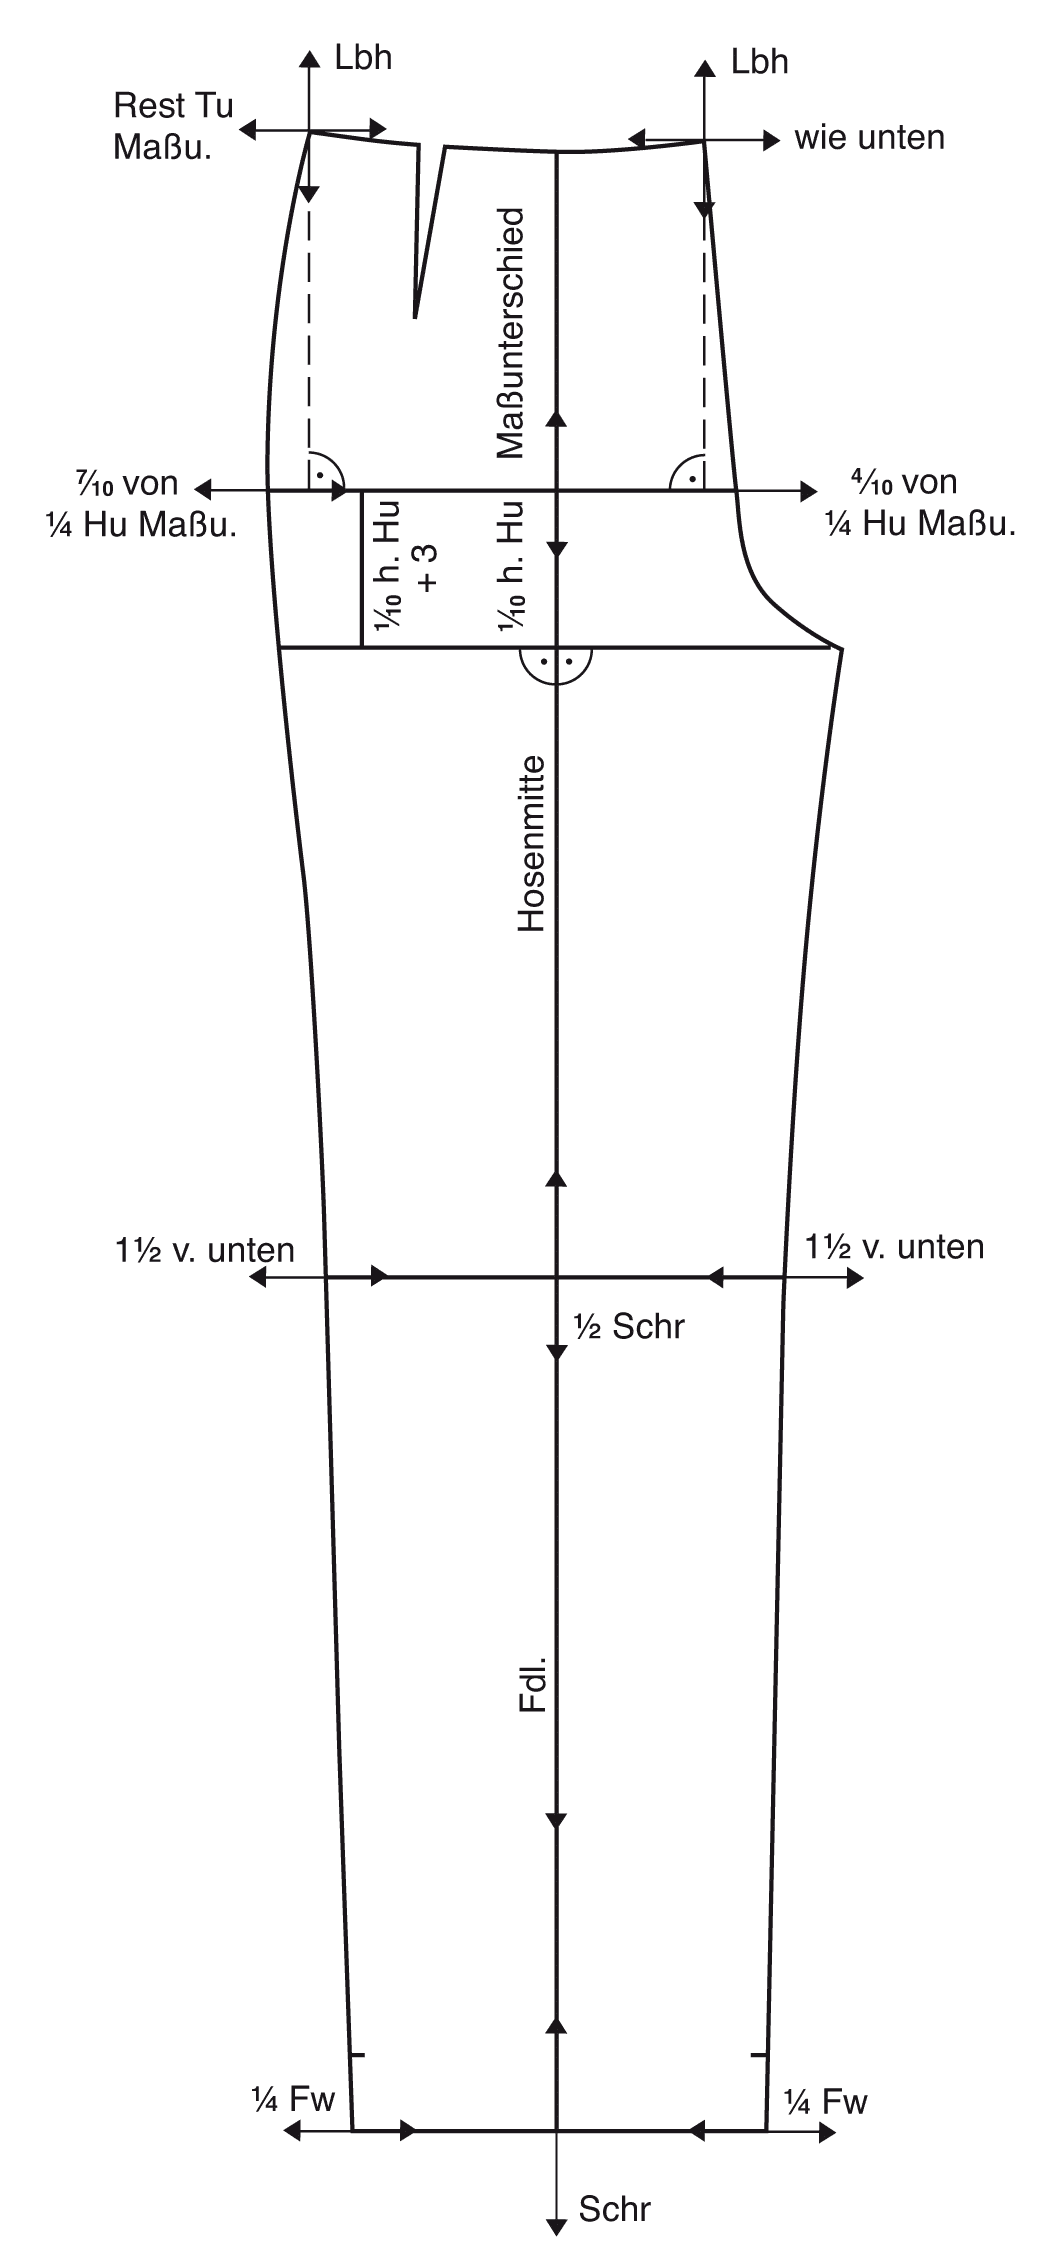
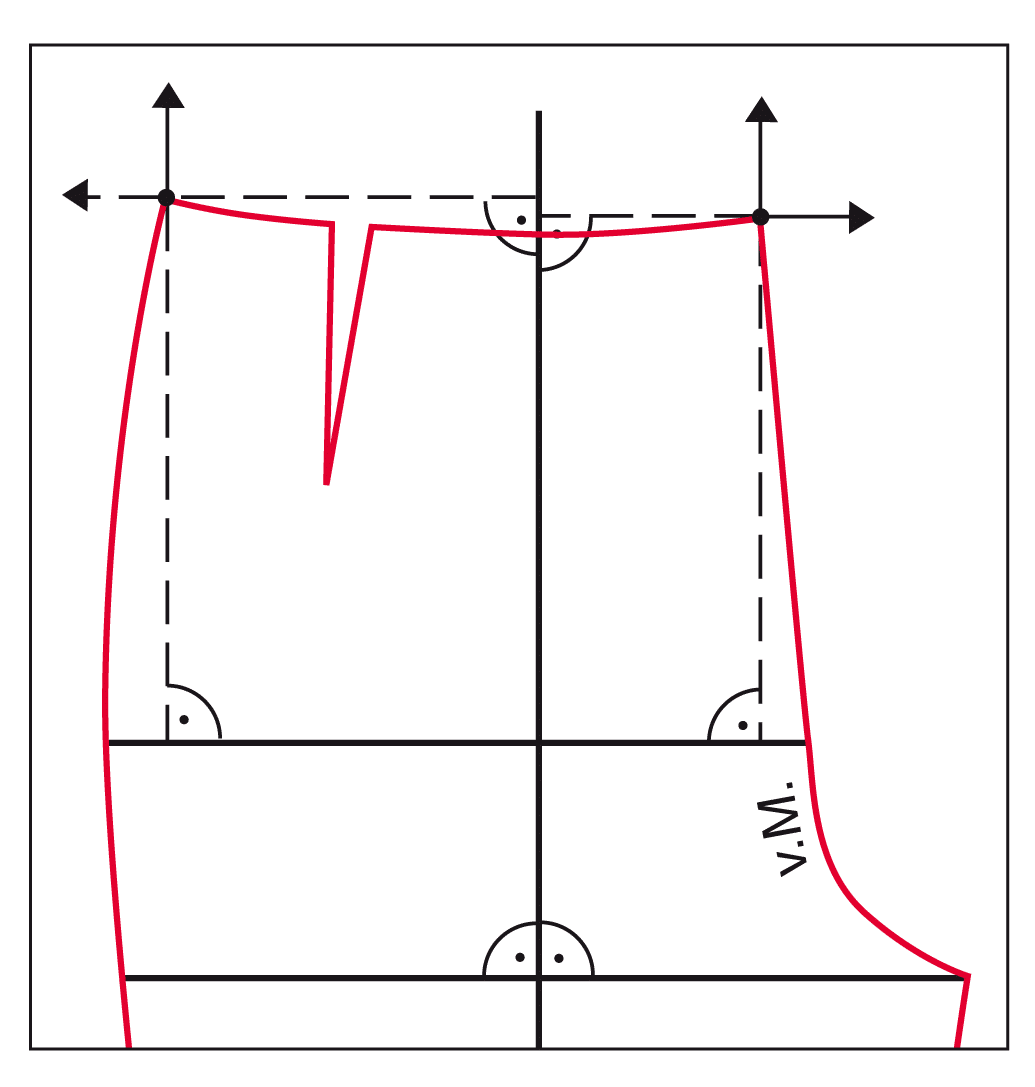
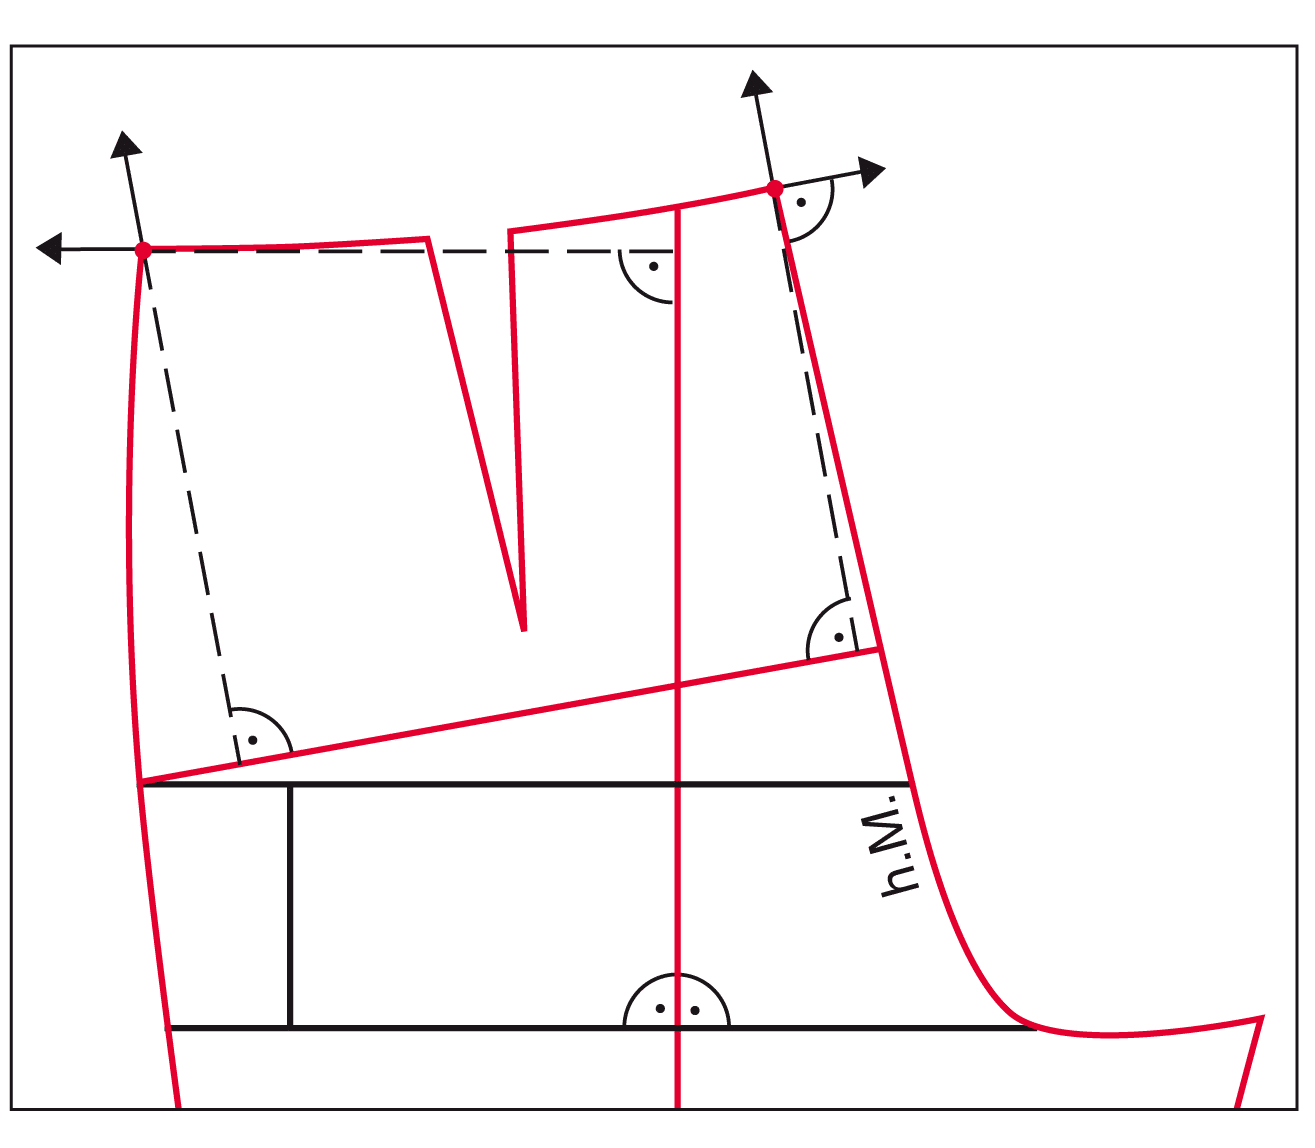
Draw the creaseline on the front and back pattern before grading the trouser pattern. Mark half of the width at the knee and at the hem. Connect both points with a straight line and extend the creaseline upward. Draw the knee line, the crotch line and the hipline perpendicular to the creaseline. Determine the position of the hip depth with 1⁄10 of half hip measurement plus 3 cm. On the back pattern, draw the hipline perpendicular to the slanted centre back.
This reference book focusses on the special subject of increasing and decreasing patterns in size according to the M. Müller & Sohn system – also known as GRADING.
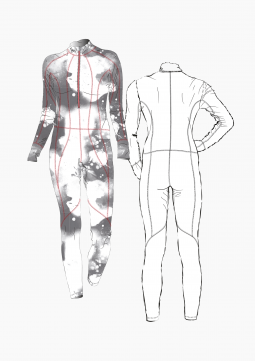
Sizing information of the waist and hip measurements for the respective customers or target groups are required for grading trousers as well as skirts. These measurements are taken from existing size charts or developed as preferred and proportionally distributed. The width at the knee and at the hem is graded as required for the particular design. The trouser styles illustrated here in the basic size 38 have been already fitted and optimized. The patterns are without seam or hem allowances but with marker points as well as notches and the patterns are all labelled.
You can find these grading instructions and many other variations in our german speaking book Gradieren DOB & KOB.
Direction Indicators for Grading Ladies Trousers
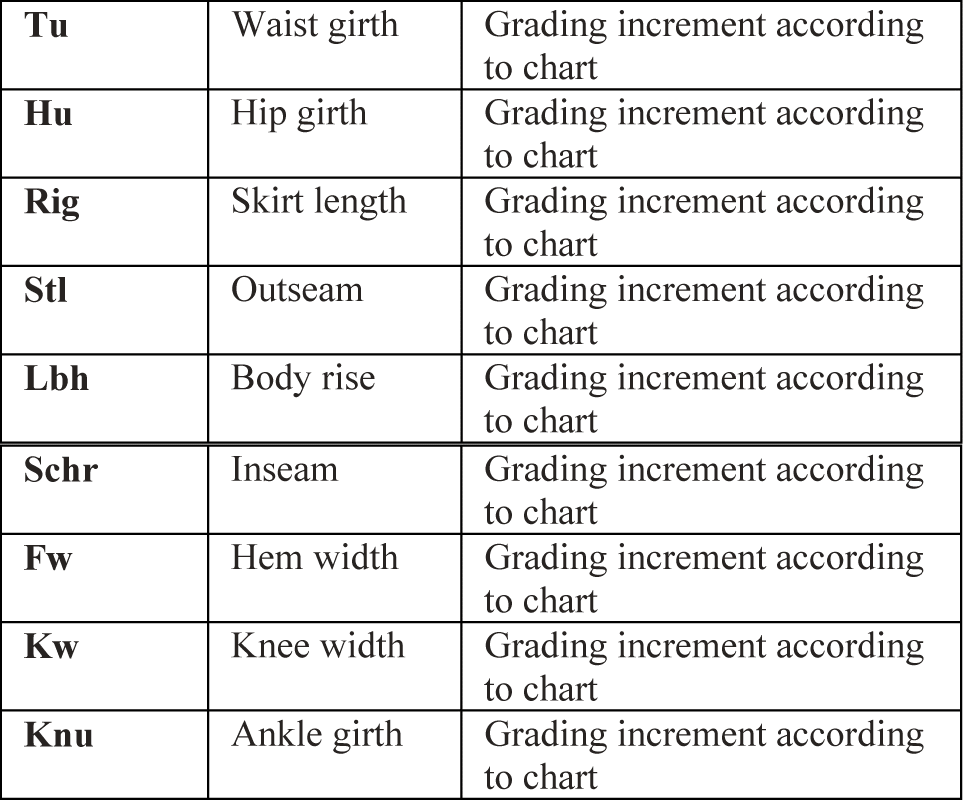
Calculation of the Hip Measurement for Proportional Increments
The nesting point for grading with proportional increments is marked in the middle of the pattern (the centre of the trousers is therefore unchanged). Measure the distance from the front and back creaseline to the sideseam as well as to the centre front and centre back. Divide these lines in tenths for the following values:
Front Trousers Pattern
Front sideseam: 7⁄10 of 1⁄4 hip girth difference
Centre front: 4⁄10 of 1⁄4 hip girth difference
Back Trousers Pattern
Back sideseam: 7⁄10 of 1⁄4 hip girth difference
Centre back: 2⁄10 of 1⁄4 hip girth difference
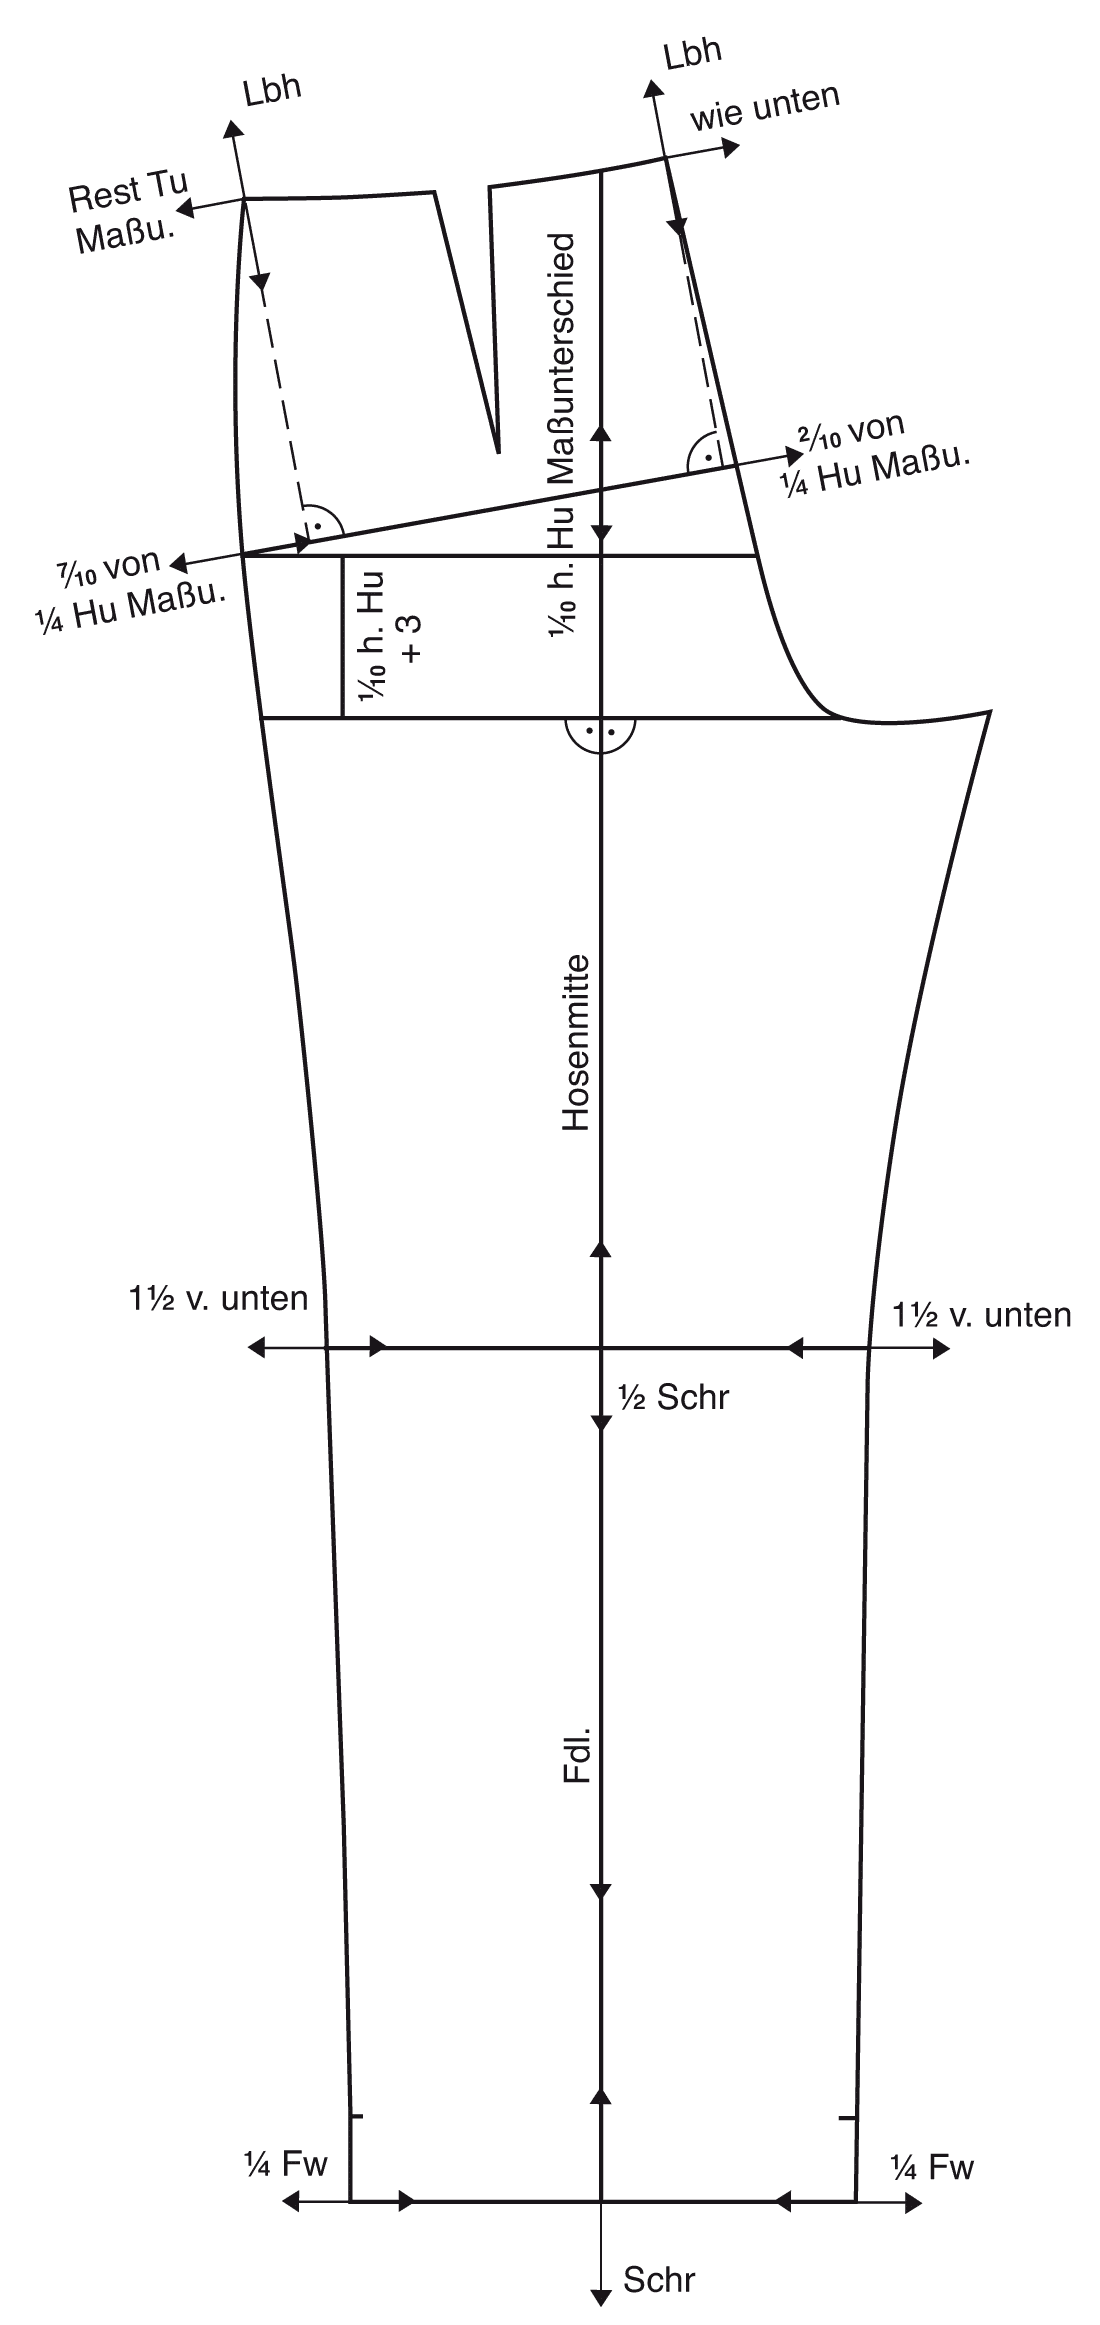
Calculation of the Waist Measurement for Proportional Increments
Grade the waist at the centre front and centre back by the same amount as the hip to keep the seamlines as parallel as possible. The grade rules for the sideseam arise as a result of the remaining waist girth difference:
Front Trouser Pattern
Front sideseam: Remaining waist girth difference
Centre front: 4/10 of 1/4 hip girth difference
Back Trouser Pattern
Back sideseam: Remaining waist girth difference
Centre back: 2/10 of 1/4 hip girth difference
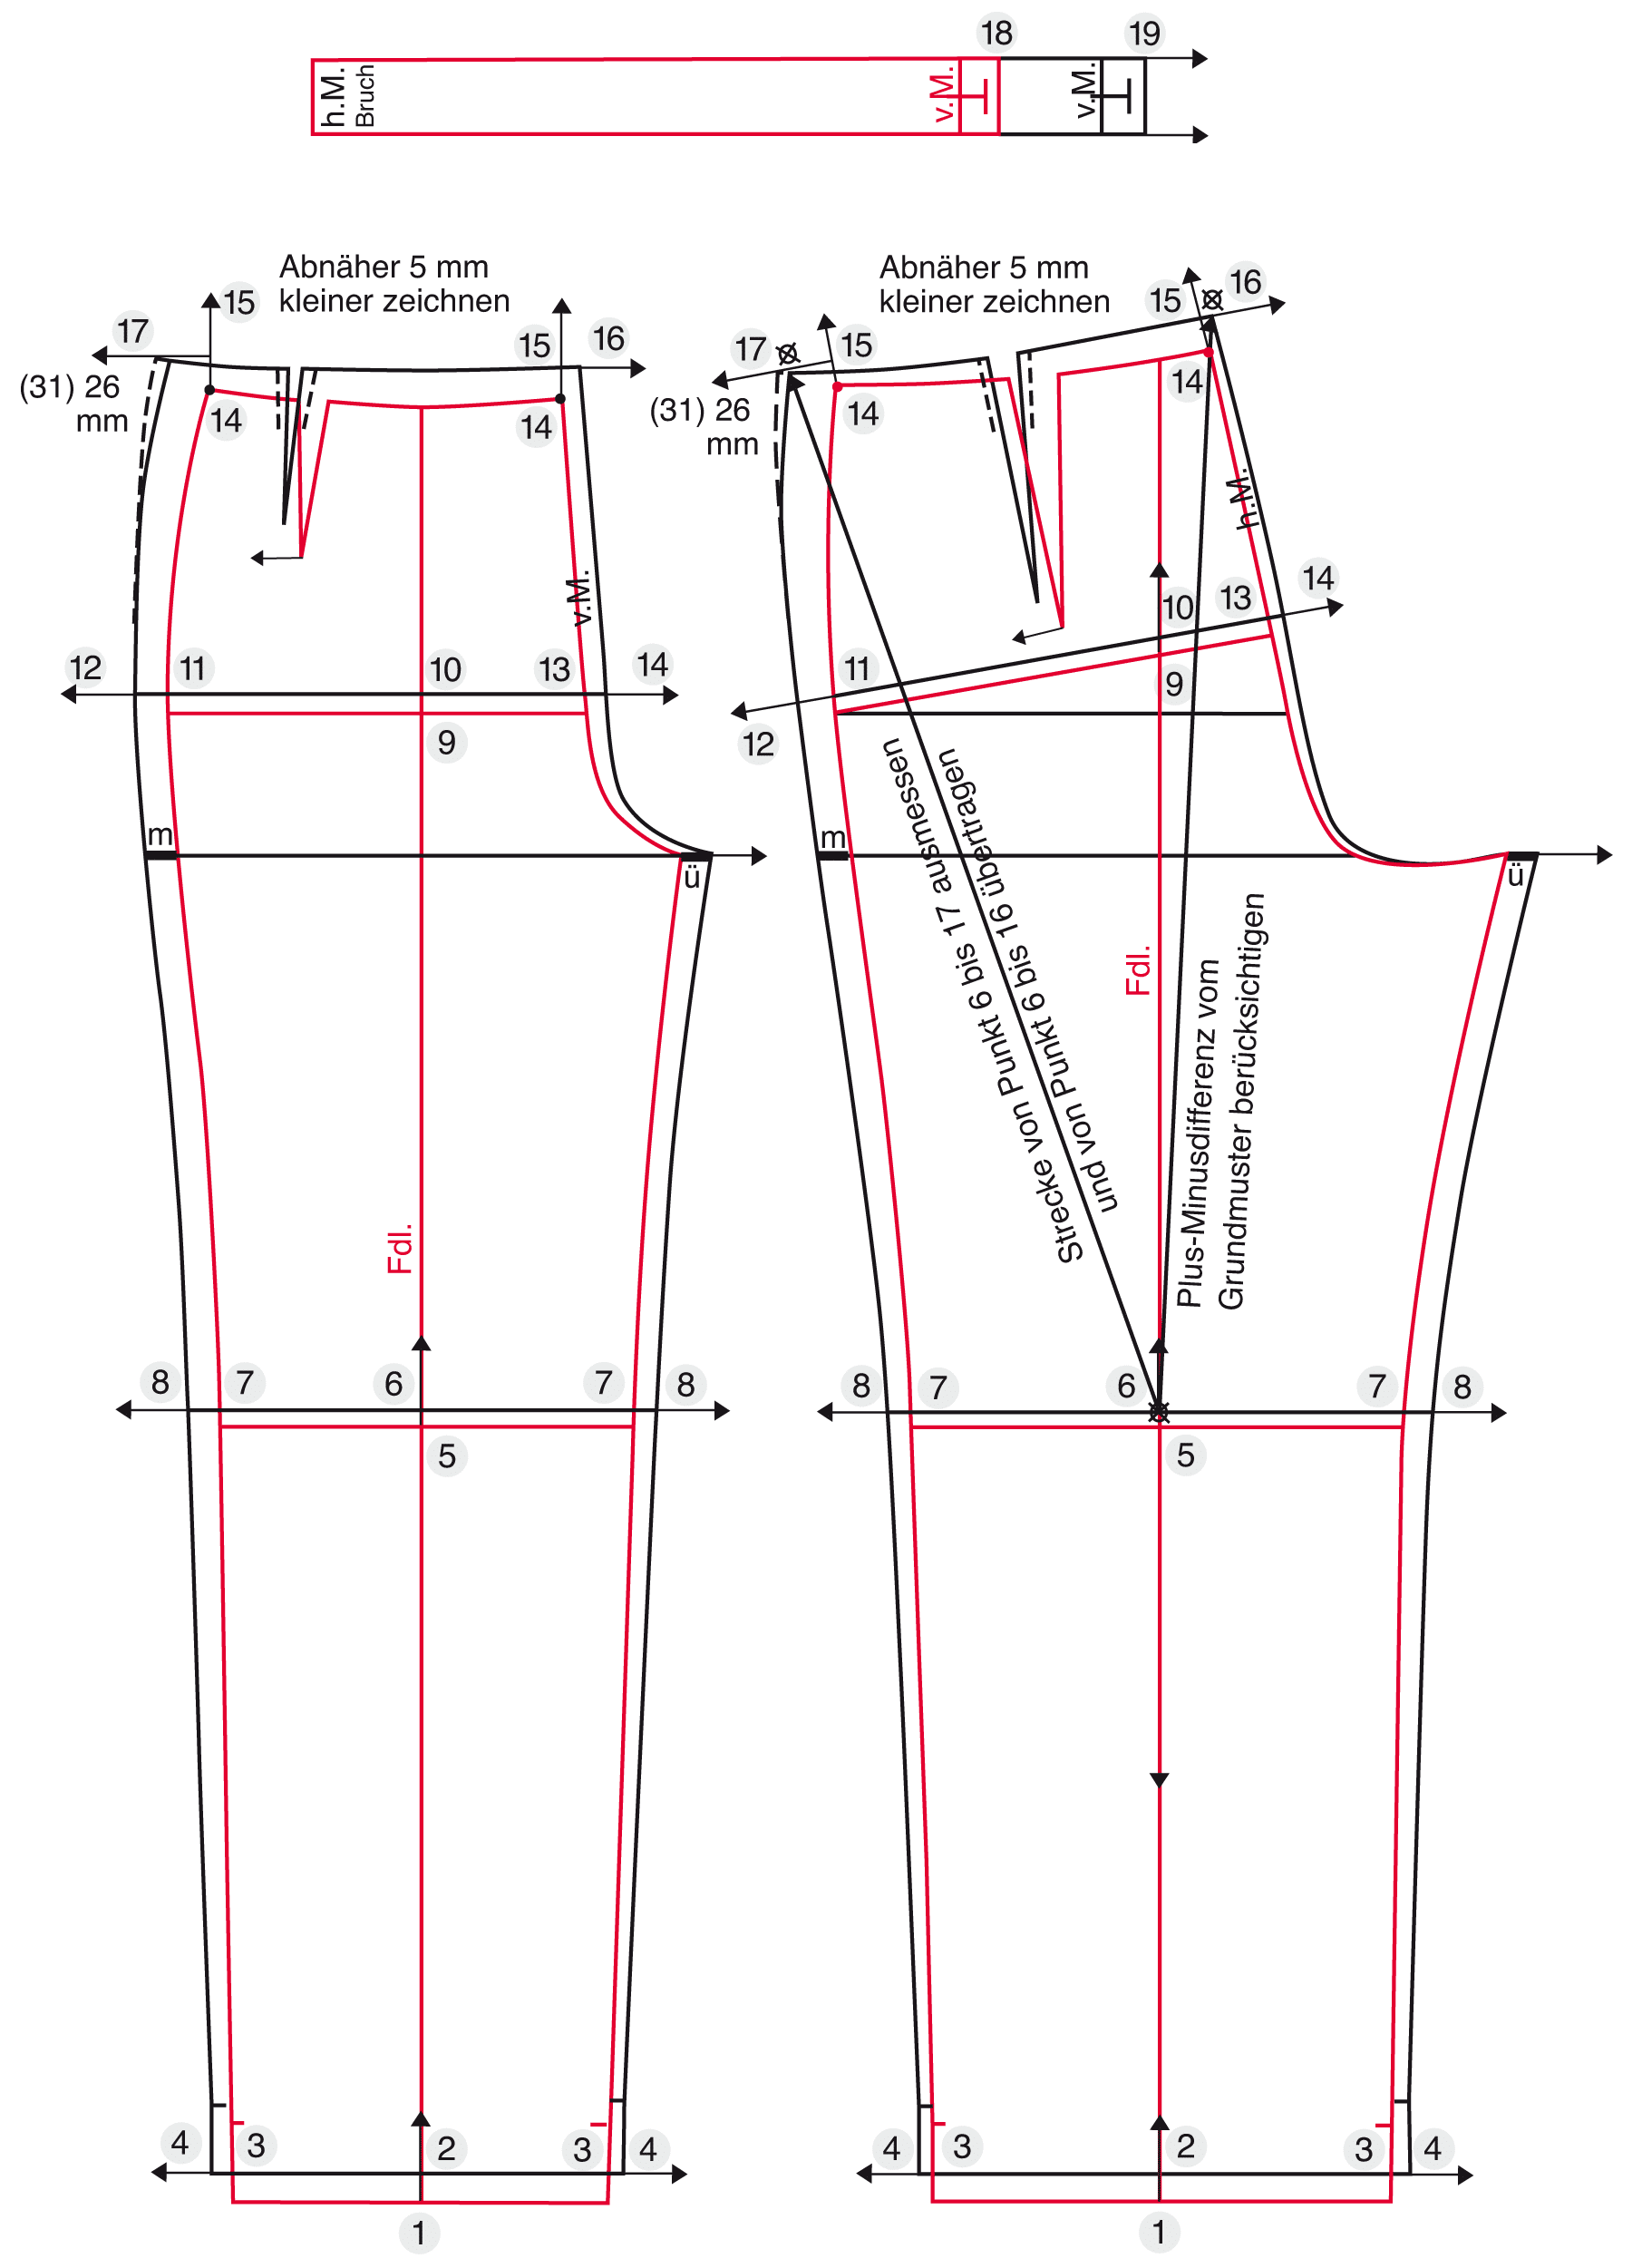
Grading a Ladie’s Trousers Pattern with Darts from Size 38 to Size 46
All key points for the grading are set and the increments can be calculated.
Increment Calculation
Increments according to the size chart from size 38 to size 46:
- Waist girth: 40 mm + 40 mm + 40mm + 40 mm = 160 mm
- Hip girth: 30 mm + 30 mm + 30 mm +30 mm = 120 mm
- Body rise: 4 mm + 4 mm + 4 mm + 4 mm = 16 mm
- Inseam: 4 mm + 4 mm + 4 mm + 4mm = 16 mm
- Hem width: 10 mm + 10 mm + 10 mm + 10 mm = 40 mm
- Knee width: 15 mm + 15 mm + 15 mm + 15 mm = 60 mm
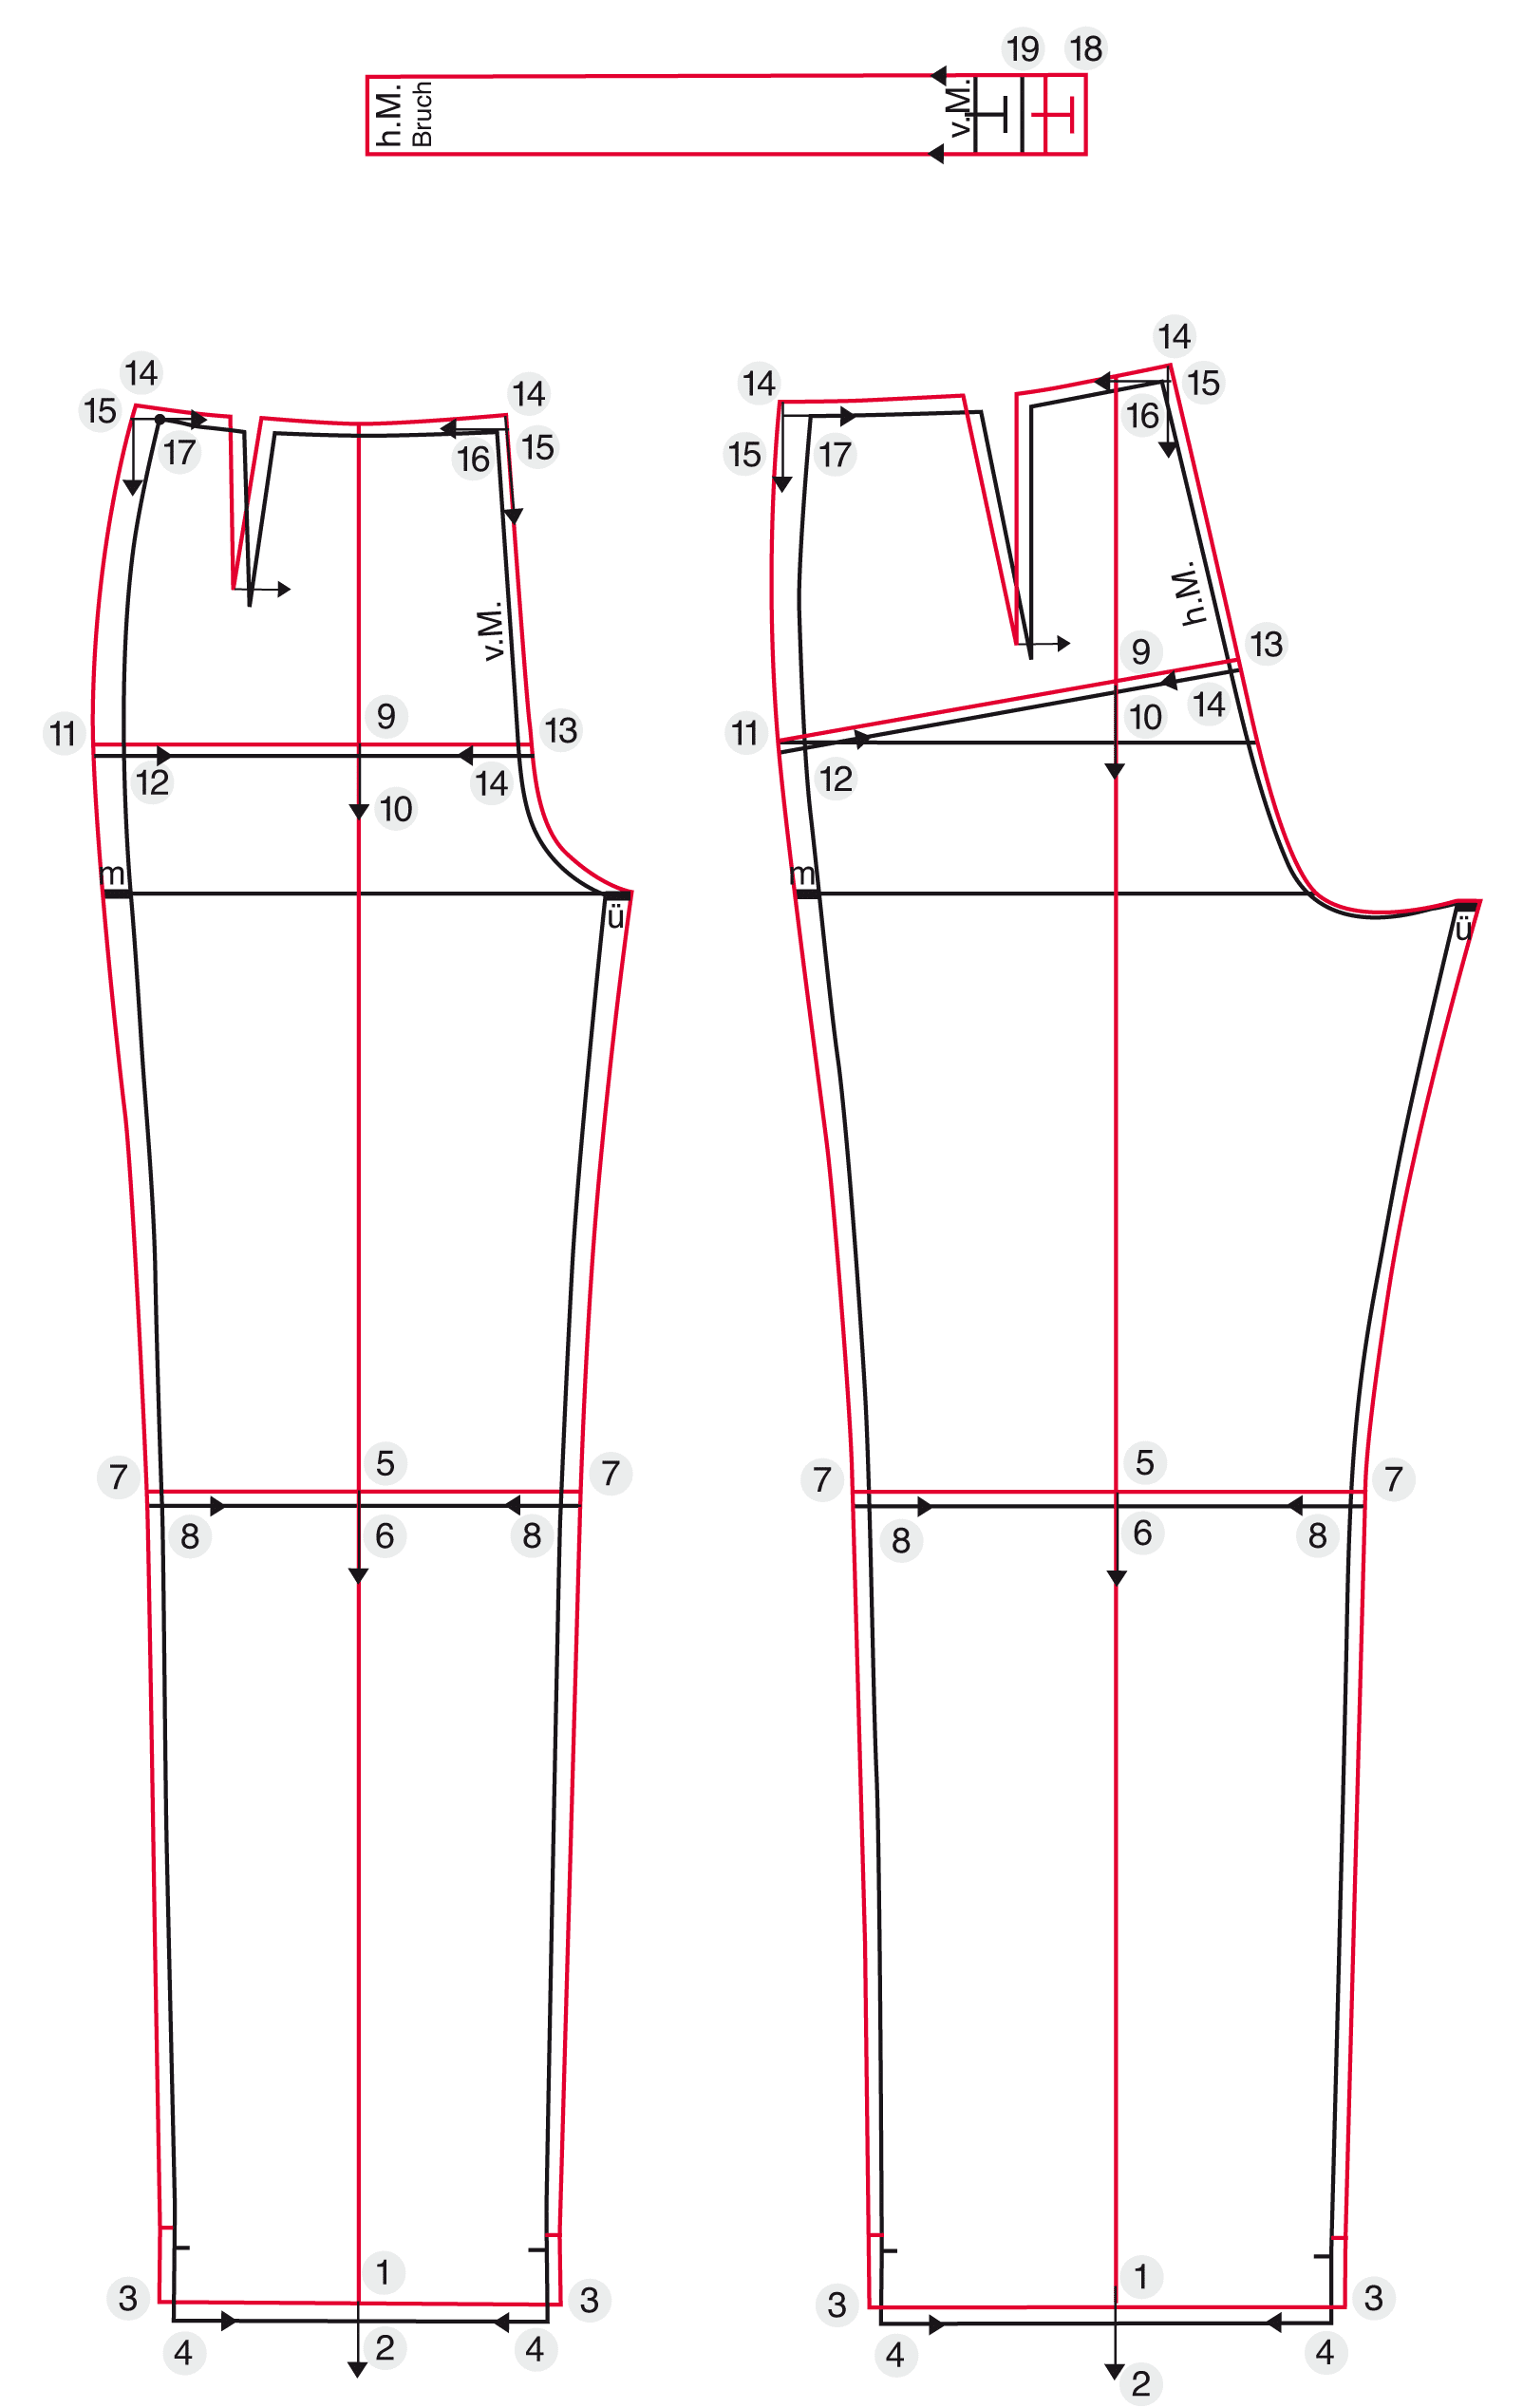
Grading the Front and Back Pattern
1–2 Inseam: 16 mm, measure upward.
3–4 ¼ Hem width: 10 mm. Distribute the hem width to all four seams on the front and back trousers. Draw the new hemline parallel to the basic pattern.
5–6 ½ Inseam: 8 mm. Move the knee line half of the inseam increment upwards.
7–8 ¼ Knee width: 15 mm. Distribute the knee width to all four seamlines on the front and back pattern.
9–10 Hipline: 1/10 of ½ hip girth difference = 6 mm.
This line moves upwards on the front and back trouser pattern.
11–12 Front and back sideseam: 7⁄10 of 1⁄4 hip girth difference = 21 mm. Measure this amount to the outside on the raised hipline (see proportional increments).
13–14 Centre front: 4⁄10 of 1⁄4 hip girth difference =12 mm.
13-14 Centre back: 2⁄10 of 1⁄4 hip girth difference = 6 mm.
14–15 Body rise: 16 mm.
15–16 Centre front: Waist girth difference = 12 mm. Grade the waist by the same amount as the hip to keep the centre front as parallel as possible.
15–17 Front and back outseam: Remaining waist girth difference = 31 mm.
Grade the waist 5 mm less at the outseam to achieve a stronger shaped hip curve. At the same time, reduce the intake at the front and back waist dart by the same amount.
The remaining waist girth difference is calculated as follows:
Centre front 12 mm + centre back 6 mm =18 mm.
1⁄2 waist girth difference = 80 mm minus 18 mm = 62 mm = 31 mm each side.
15–16 Centre back: waist girth difference = 6 mm.
Grade the waist by the same amount as the hip to keep the centre back as parallel as possible. Plot the new seamlines starting at the sideseam because of the gap that forms at the crotch line. This distance has to be transferred to the inseam to equalize the seam lengths (see bold line). Use the basic pattern as a template and move the basic knee line upward to the new knee line. Then draw the new sideseam from the knee to the hem and from the knee upward to the hipline. Turn the basic pattern according to the waist increment and draw the hip curve. Measure the gap that results at the crotch line and transfer this amount to the inseam. Draw the inseam in the same way as the sideseam.
Draw the centre front and centre back seam. Draw the crotch curve to the endpoint of the inseam. Plot the waistline and the darts. Move the front dart around half of the sideseam increment between points 15-17.
Use the basic pattern as a template for drawing the new waistline and the back dart. Place the basic pattern with equal distance between the grading points 16-17 of the sideseam and the centre back.
18–19 The grading increment for the waistband is 80 mm.
Verifying the Length of the Back Trousers Pattern
Verify the length of the sideseam and the crotch seam. The length of the crotch seam must be in the same proportion to the sideseam as on the basic pattern. For example, if the back is longer than the side, the same difference must be transferred to the graded pattern. The exact way to measure is shown in figure 2.
Grading a Ladies Trousers Pattern with Darts from Size 38 to Size 34
All key points for the grading are set and the increments can be calculated.
Increment Calculation
Increments according to the size chart from size 38 to size 34:
- Waist girth: 40 mm + 30 mm = 70 mm
- Hip girth: 30 mm + 40 mm = 70 mm
- Body rise: 4 mm + 4 mm = 8 mm
- Inseam: 4 mm + 4 mm = 8 mm
- Hem width: 10 mm + 10 mm = 20 mm
- Knee width: 15 mm + 15 mm = 30 mm
Grading the Front and Back Pattern
1–2 Inseam: 8 mm, measure downward.
3–4 ¼ Hem width: 5 mm. Distribute the hem width to all four seams on the front and back trousers. Draw the new hemline parallel to the basic pattern.
5–6 ½ Inseam: 4 mm. Move the kneeline half of the inseam increment downwards.
7–8 ¼ Knee width: 7.5 mm. Distribute the knee width to all four seamlines on the front and back pattern.
9–10 Hipline: 1/10 of ½ hip girth difference = 3.5 mm.
This line moves downwards on the front and back trouser pattern.
11–12 Front and back sideseam: 7⁄10 of 1⁄4 hip girth difference = 12.25 mm. Measure this amount to the outside on the lowered hipline (see proportional increments).
13–14 Centre front: 4⁄10 of 1⁄4 hip girth difference =7 mm.
13-14 Centre back: 2⁄10 of 1⁄4 hip girth difference = 3.5mm.
14–15 Body rise: 8 mm. Lower the body rise as shown in figure 1a and 1b.
15–16 Centre front: Waist girth difference = 7 mm. Grade the waist by the same amount as the hip to keep the centre front as parallel as possible.
15–17 Front and back outseam: Remaining waist girth difference = 12.25 mm.
The remaining waist girth difference is calculated as follows:
Centre front 7 mm + centre back 3.5 mm =10.5 mm.
1⁄2 waist girth difference = 35 mm minus 10.5 mm = 24.5 mm = 12.25 mm each side.
15–16 Centre back: waist girth difference = 3.5 mm. Grade the waist by the same amount as the hip to keep the centre back as parallel as possible.
Plot the seamlines of the graded front and back trouser pattern in the same way as already described in figure 2. Verify the length of the sideseam and the crotch seam.
18–19 The grading increment for the waistband is 35 mm.

Further instructions for pattern construction, grading and patterns for sewing trousers can be found in our online shop.

Hello
thank you for this subject
may i have knee width and Ankle girth for each size
I have book “Gradieren DOB & KOB” translated in persian
but it has not these two items in its charts
Dear fezzeh, please find all measurement charts in our online shop > https://www.muellerundsohn.com/en/shop/download-measurement-charts/
Hi,
Thank you so much for this article, it’s very helpful! Just a couple of questions/observations:
Do you have the images of the grading translated into English? It’s difficult to understand exactly what is going on with the original German labels on the images.
In the final images of the nested patterns the smaller pattern appears to be shorter in the rise, but longer in the leg. Is this intentional?
Thanks!
Yes of course, we will exchange the picture at the next occasion. In the book Grading Women & Kids all gradings and illustrations are explained in English. The red pattern is the base size from which you enlarge or reduce. The length measures change rather slightly during the grading compared to the width measures.