

Grading a Basic Bodice Block
Deutsch

This article is an extract of our textbook Gradieren DOB & KOB.
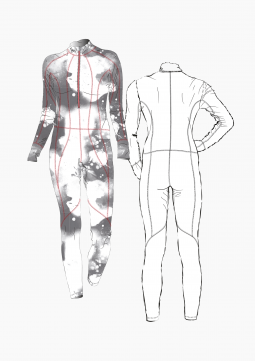
(Photo Credit: © CATWALKPIX.COM)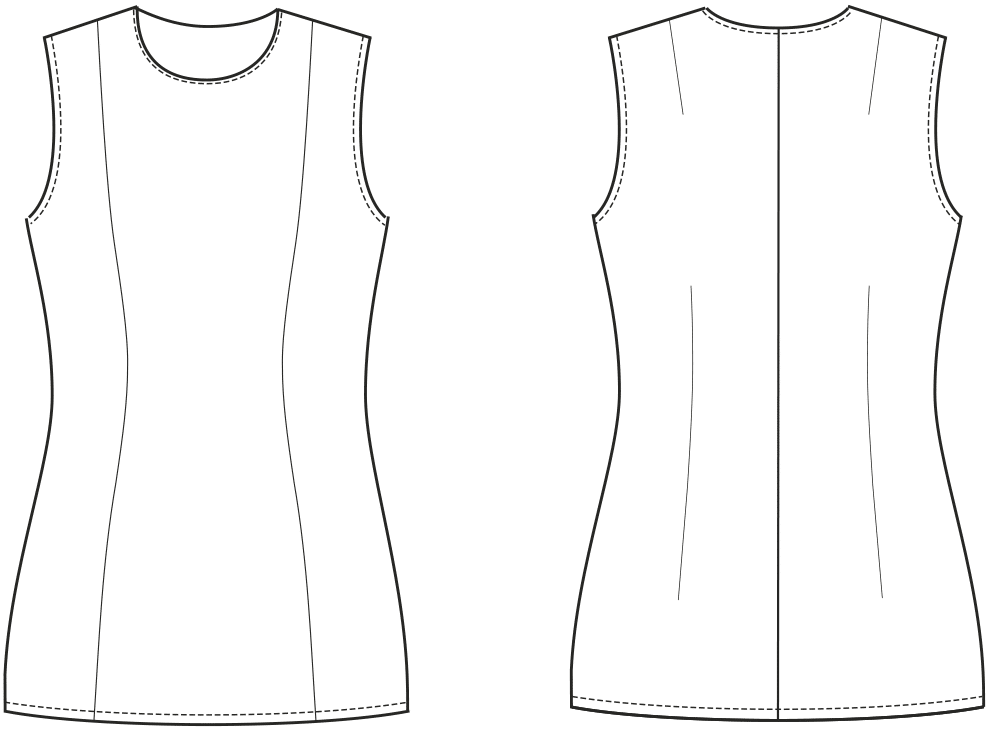
Setting the Zero-Lines
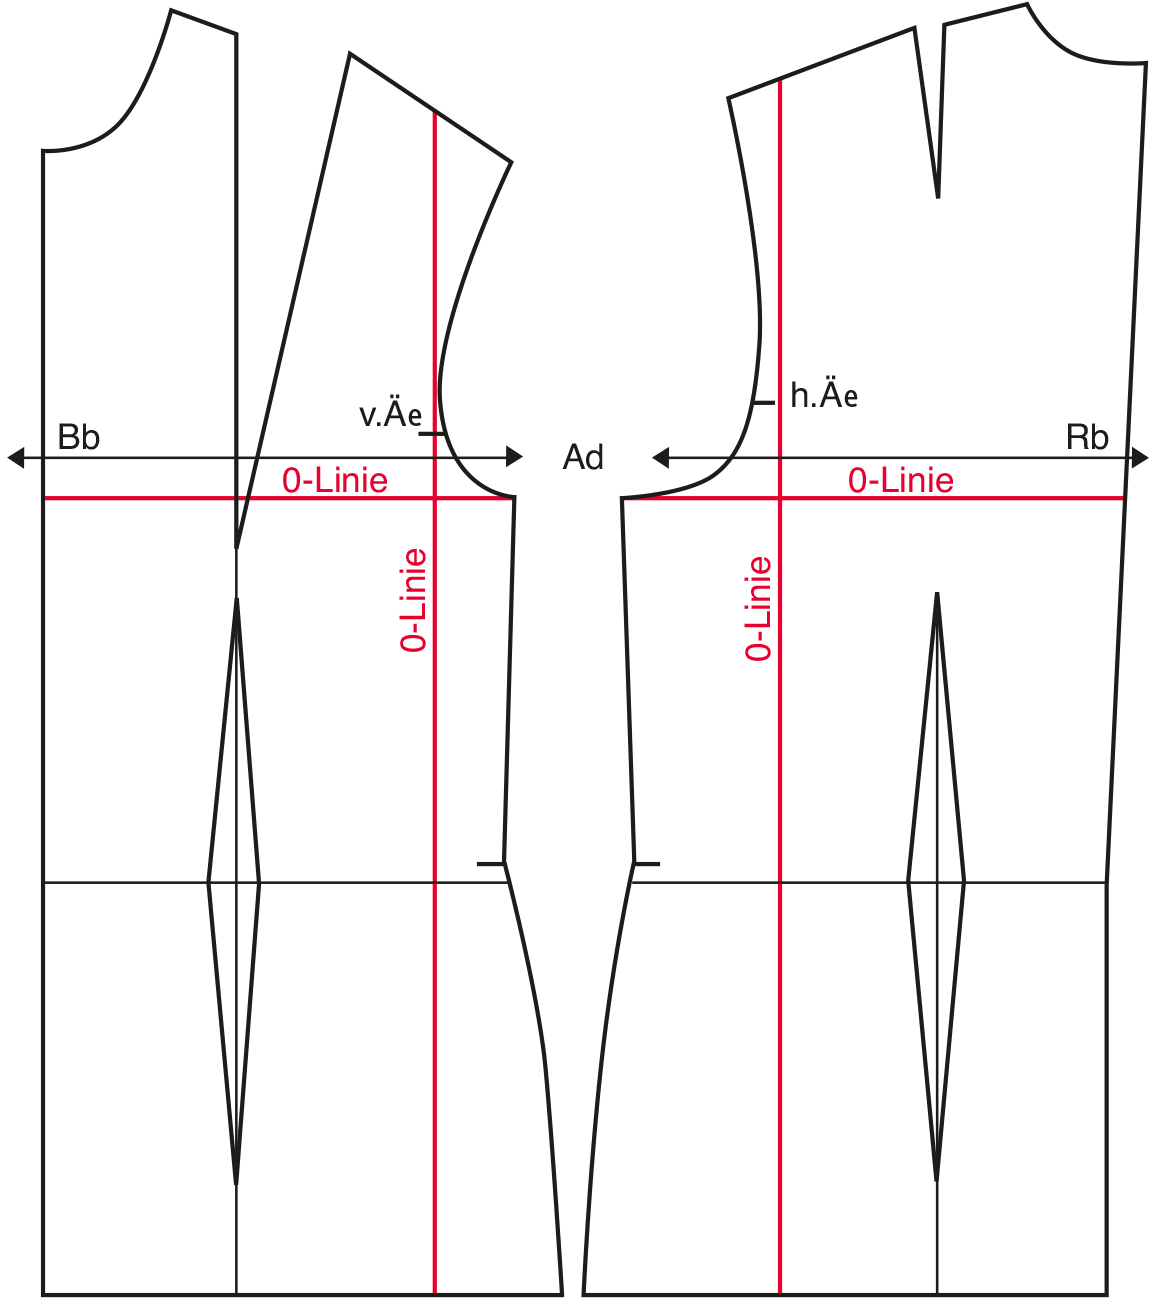
Zero-lines are baselines that do not change during the grading. Which construction lines are set as baselines can vary depending on whether the grading is done manually or with the computer. The baselines may also vary depending on the style and the grading direction. Mark the chestline, the back width line and the front pitch line as zero-lines for this bodice pattern.
Direction Indicators
The grading directions are indicated by arrows on the front and back pattern. The measurements are marked with abbreviations. Some directions are marked perpendicular to construction lines of the basic block.
Grading a Bodice Block with Darts from Size 38 to Size 46
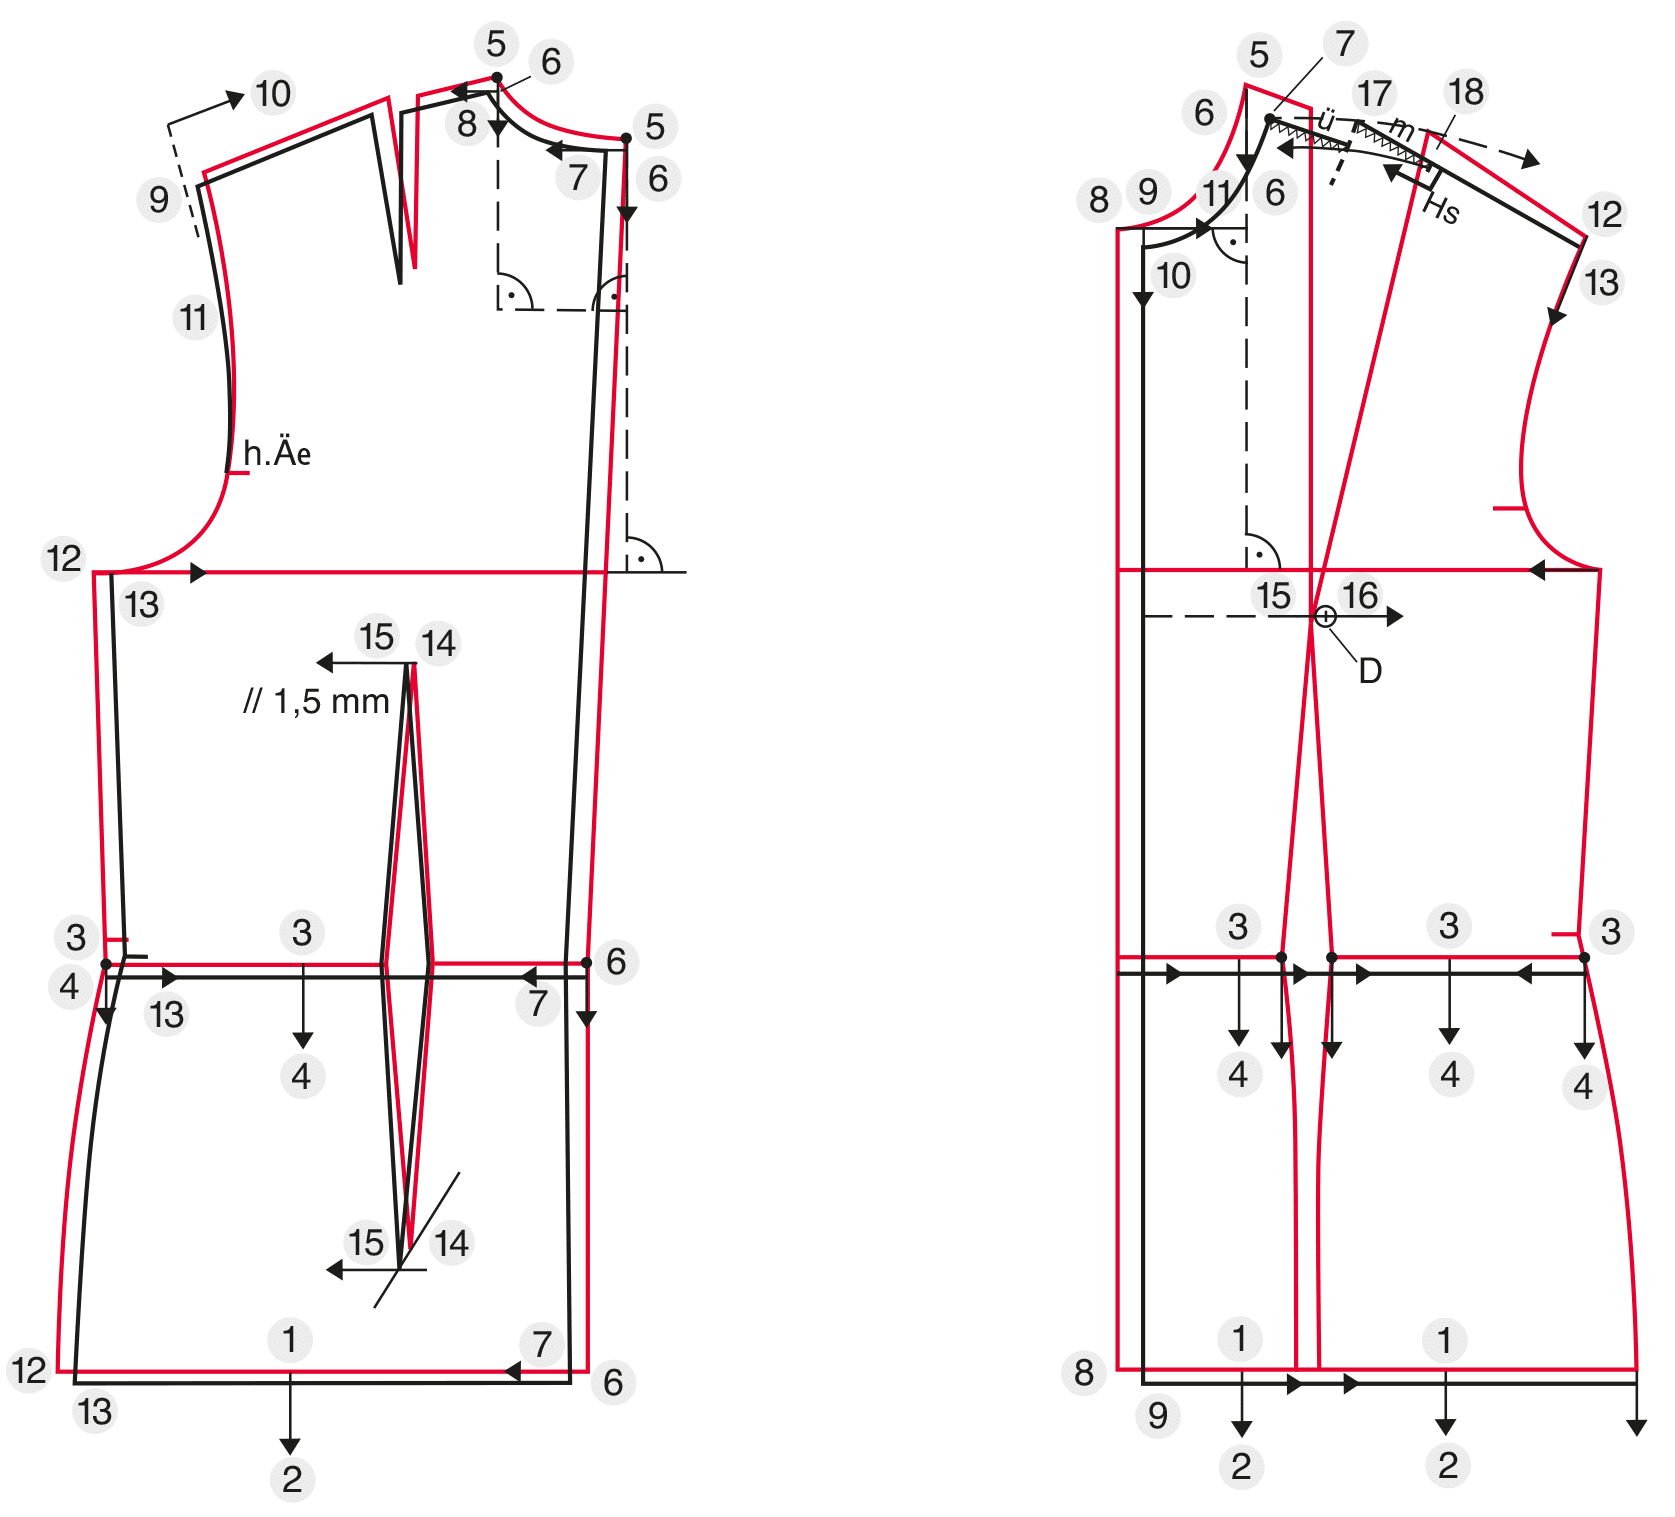
The base size 38 is also called the basic template. It is important to mark the grading points from which the increments are measured. The grading points are marked with bold numbers in the text and with encircled numbers in the illustration.
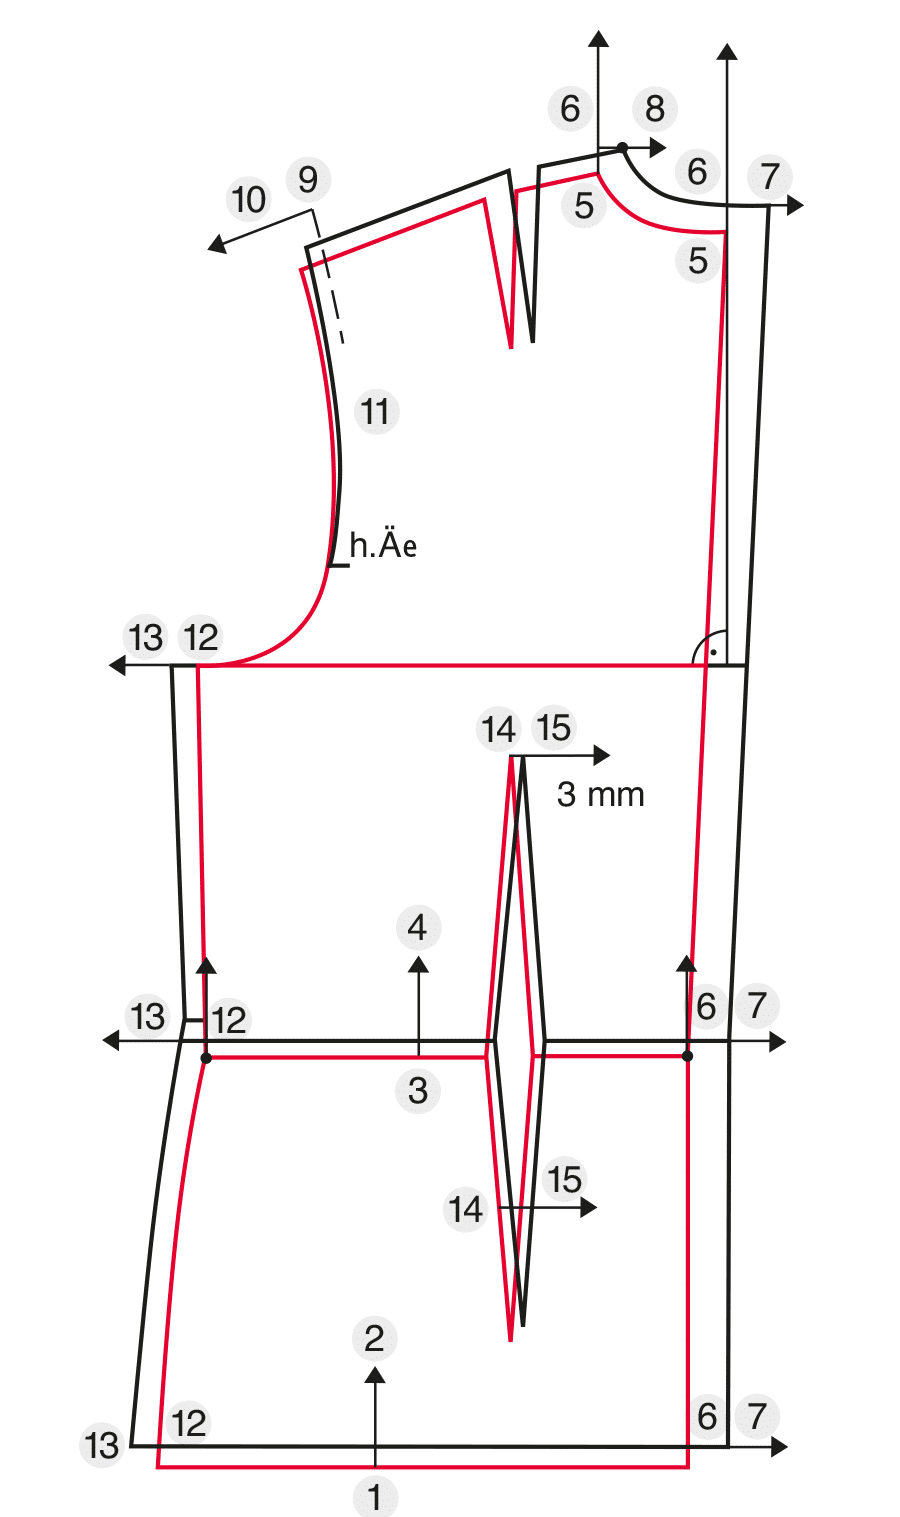
Back Pattern
Sizes 40, 42 and 44 are skipped when the grading from size 38 to size 46.
1–2 Length increment 6 mm. The length can be graded depending on the design (here 1.5 mm per size). The total length changed around 2.5 mm for this example.
3–4 Back waist length/waistline relocation 8 mm. The increment for the back waist length is 2 mm per size according to the size chart. The back waist length/waistline relocation must be adjusted by another 2 mm since the scye depth has been already extended by 4 mm. Draw the new waistline parallel to the basic pattern. Transfer the shape of the sideseam and the sideseam notch.
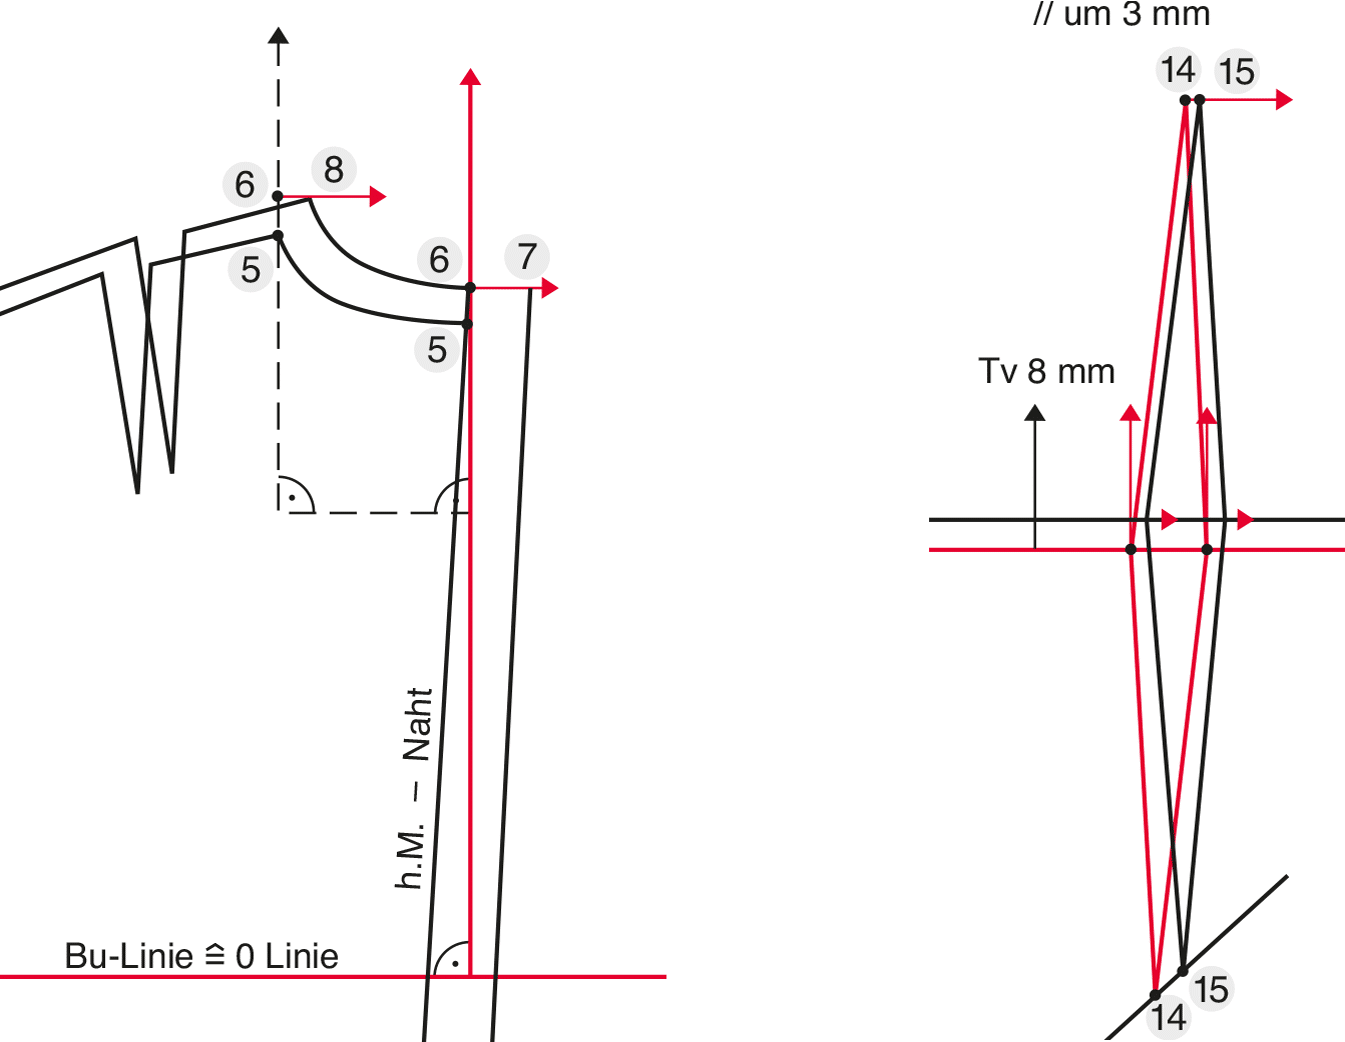
5–6 Scye depth increment: 16 mm. The amount is measured vertically in extension of the centre back and neck point (see detail illustration).
6–7 Back width increment: 20 mm. Measure the back width increment at the neckline, the waistline and the hemline from the centre back horizontal to the right. Draw the new centre back seam.
6–8 Neck point: Back width increment 20 mm – neck width increment 8 mm = 12 mm.
Measure the neck point increment to the right and draw the new neckline using the basic pattern as a template.
Shoulder increment: Place the basic pattern on point 8 parallel to the centre back and mark the endpoint of the shoulder as point 9 in preparation for the shoulder grading.
9–10 Shoulder increment: 8 mm. Lengthen the shoulder line to the outside. Mark the shoulder dart with the same distance to the neck point as on the basic pattern.
11 Back armhole: Draw the back armhole curve from point 10 to the back armhole notch using the basic pattern as a template. The back armhole notch remains unchanged.
12–13 1⁄2 scye width increment: 14 mm. Divide the scye width increment of 28 mm equally to the sideseams on the front and back pattern. Draw the new sideseams using the basic pattern as a template. Mark the intake at the waist at the graded waist point.
14–15 Waist dart calculation: Back width increment 20 mm – scye width increment 14 mm = 6 mm, divided by two = 3 mm
Relocate the back waist dart 3 mm parallel to the right. The upper dart end point remains at the same level whereas the lower dart endpoint moves up. You can also draw the back waist dart without calculating the increment. Place the basic pattern halfway between the graded sideseam and the graded centre back seam.
Front Pattern

1–2, 3–4 Length increment and waistline relocation same amount as on the back pattern.
5–6 Front waist length increment: 32 mm. Measure the front waist length increment vertically upward from the neck point (see perpendicular guidelines).
6–7 Front neck point: Chest width increment 32 mm – neck width increment 8 mm = 26 mm.
8–9 Chest width increment: 32 mm. Measure this amount from the neckline and the hemline parallel to the centre front.
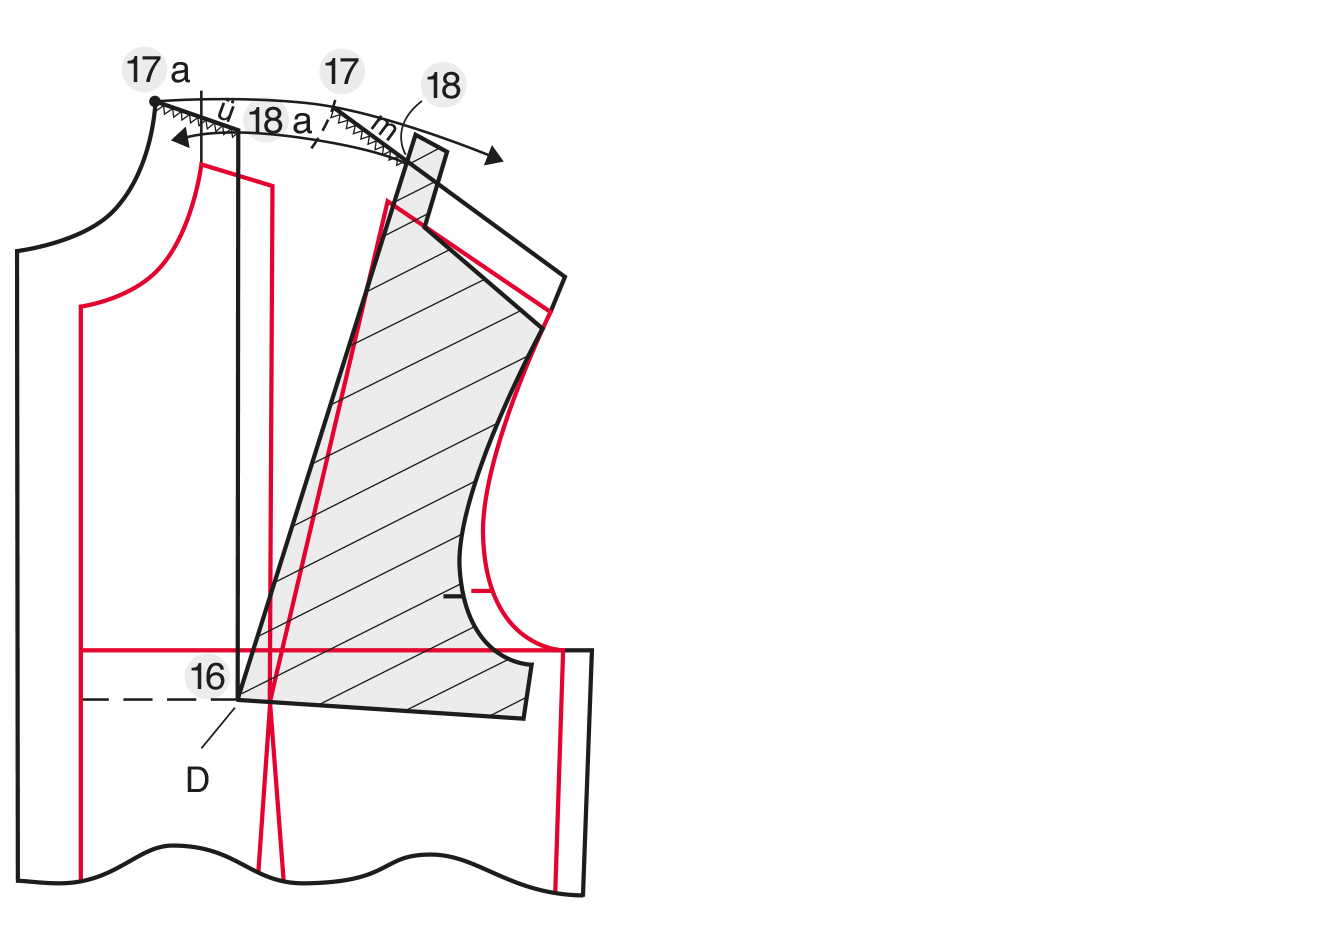
9–10 Auxiliary point for the neckline: Front waist length – 1⁄2 neck width = 28 mm (measure upward). Make a template for the front neckline (see illustration 2a).
11 Place the neckline template with point 7a on point 7 and turn point 8a to point 10.
Now draw the new neckline.
12–13 Armhole increment: 14.4 mm. Lengthen the armhole curve upwards.
14 Shoulder width increment: 8 mm. Measure along the shoulder line of the template (see illustration 2a).
5–16 Horizontal bust point: Chest width increment 32 mm – abdomen width 16 mm = 16 mm. The graded bust point is the pivot point for the circular arc over point 7.
17 Placement of the pattern template: Place the extended shoulder line with point 14 on point 13 and point 7 on the circular arc (= point 17). Draw the shoulder seam.
18 Neck width increment: 8 mm. Relocate the front shoulder piece to the right for a better proportion. Point 18 also marks the position of the right dart legs. Draw a circular arc over point 18 to the left with pivot point 16 (new bust point). The seam transfer makes it possible to draw the new front dart leg relatively parallel to the basic template.
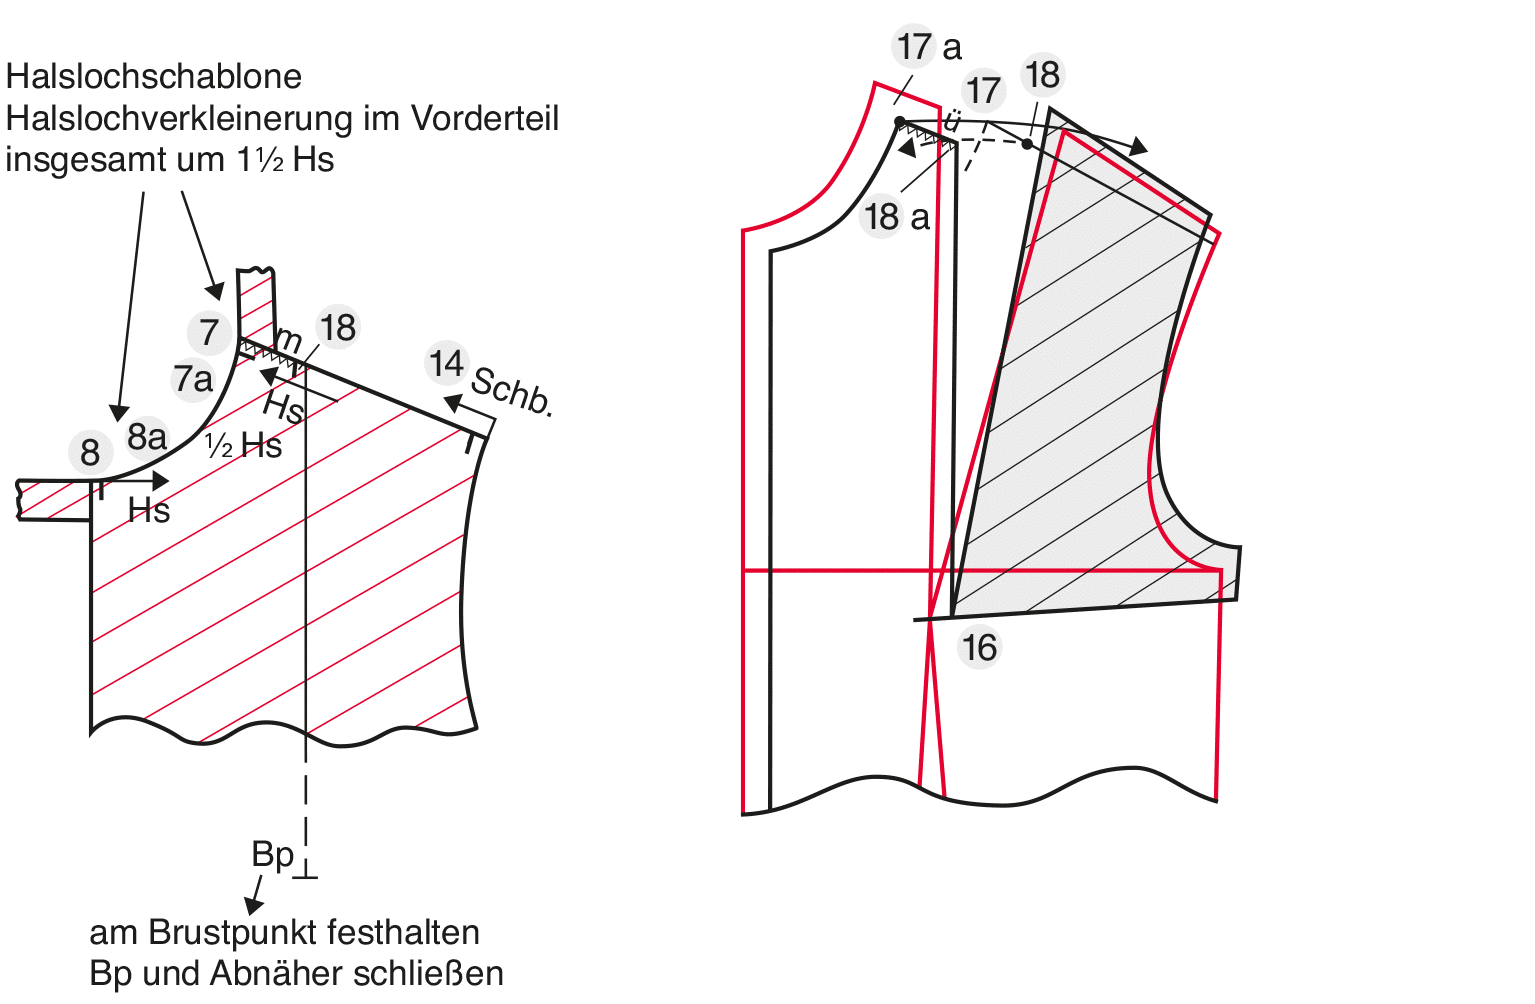
Drawing Template for the Neckline

Close the bust dart and leave extra pieces of the paper at the centre front and at the armhole.
7–7a Measure 1⁄2 neck width increment 4 mm upward.
8–8a Measure the neck width increment of 8 mm to the front.
The Increase of the Neckline Girth per Size:
Note: The back neckline length increases by 2 mm (= neck width increment), the front neckline length increases by 3 mm (= 1 ½ neck width increment). The total increase of ½ of the neckline is 5 mm. This amounts to 10 mm for the complete neckline circumference, i.e. 1 cm per size.
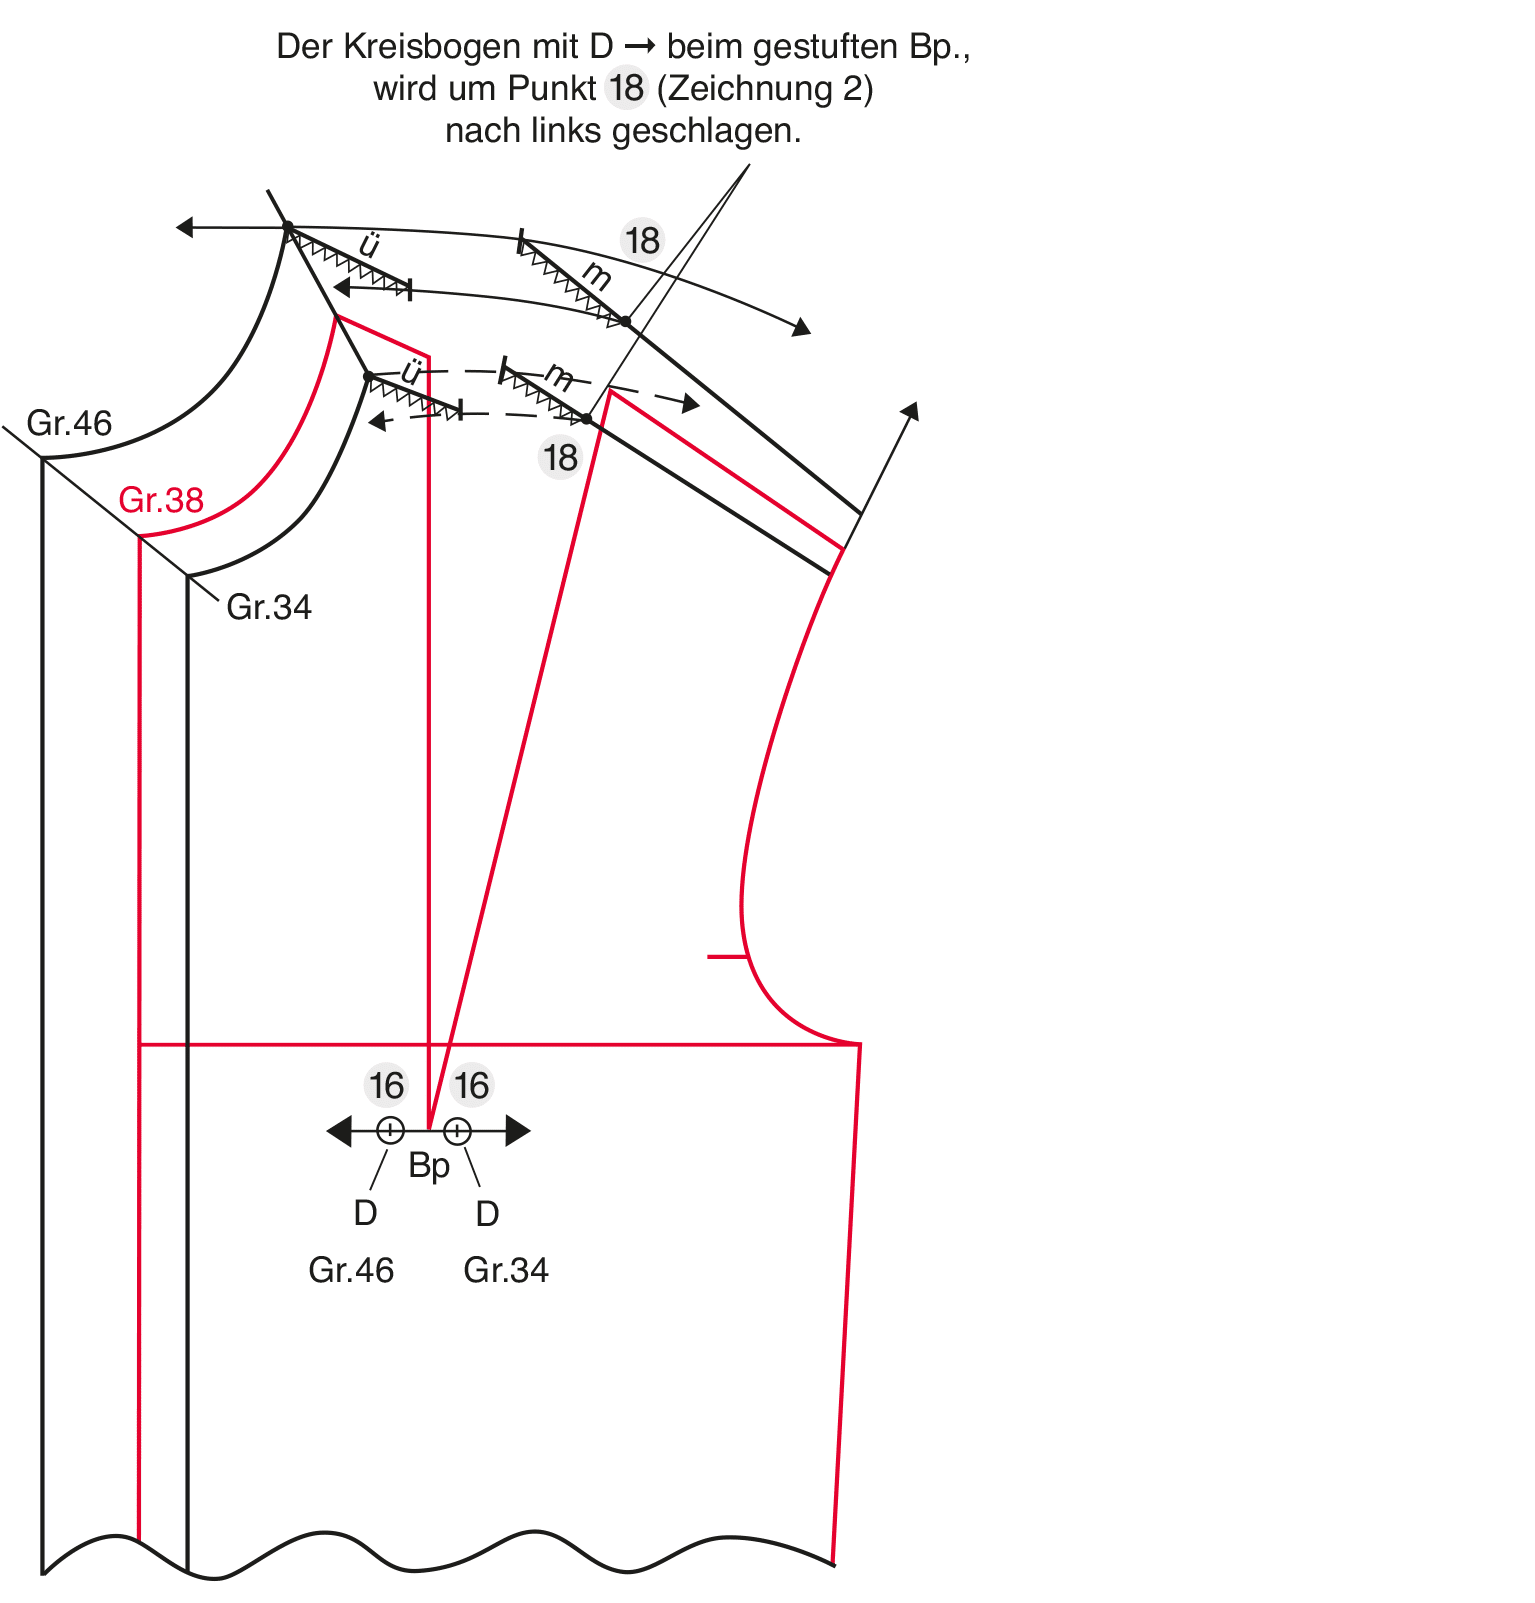
Drawing Template for the Bust Dart
Add a piece of paper to the drawing template in extension to the back dart leg. Draw the bust dart: Measure 17–18 and transfer this amount from the neck point to the circular arc.
Draw the front dart leg from point 18a to point 16 (new bust point) using the dart template and complete the bust dart from point 18 to point 16.
Completing the Front Pattern
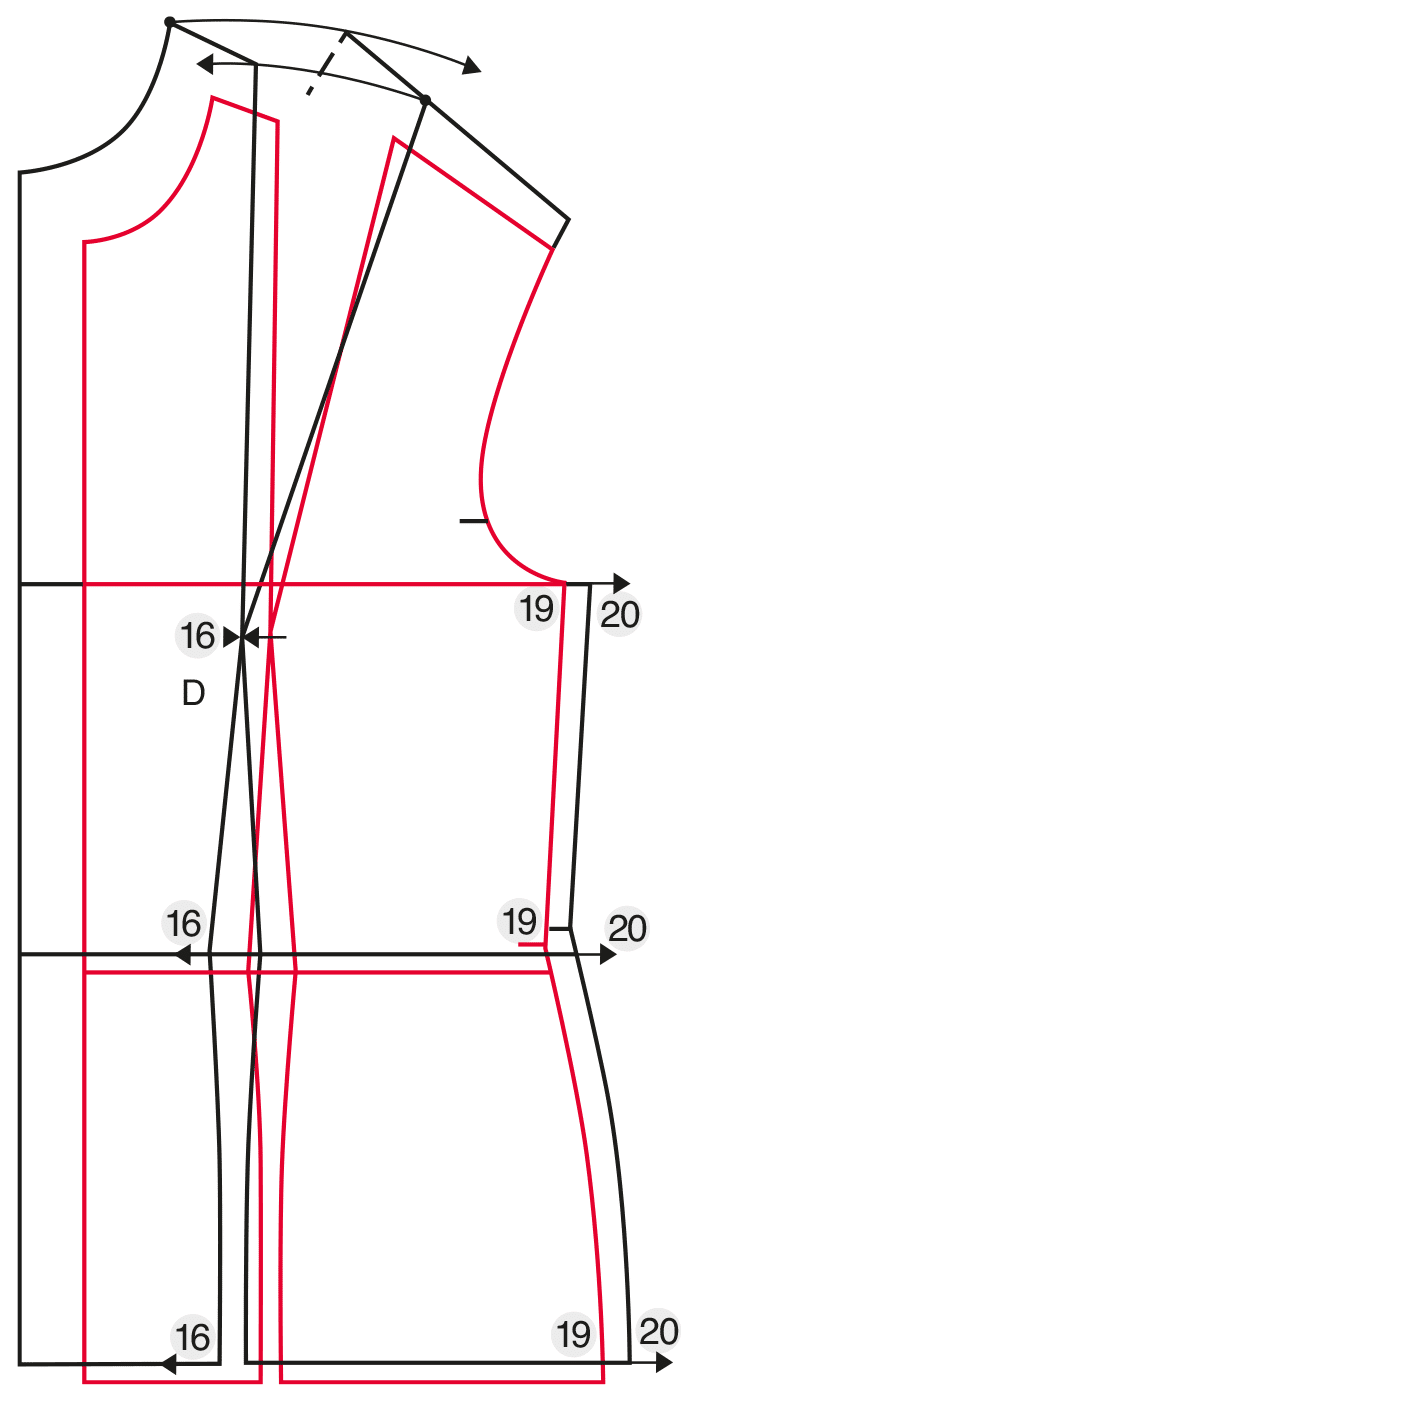
16 Shift the front waist dart with the graded bust point parallel to the front (chest width increment – abdomen width increment = 16 mm).
19–20 1⁄2 scye width increment: 14 mm. Draw the front sideseam the same way as the back sideseam.
Grading a Bodice Block with Darts from Size 38 to Size 34
Back Pattern
Skip size 36 when the grading from size 38 to size 34.
1–2 Length increment 3 mm. The length can be graded depending on the design (here 1.5 mm per size).
3–4 Back waist length/waistline relocation 6 mm. The increment for the back waist length is 2 mm for size 36 according to the size chart. Since the scye depth is already reduced by 8 mm, draw the new waistline 6 mm below the waistline of the basic pattern. Draw the new waistline parallel to the basic pattern. Transfer the shape of the sideseam and the sideseam notch.
5–6 Scye depth increment: 8 mm. Measure this amount downward at the centre back and at the neck point (see detail illustration).
6–7 Back width increment: 10 mm. Measure the back width increment at the neckline, the waistline and the hemline from the centre back horizontal to the left. Draw the new centre back seam.
6–8 Neck point: Back width increment 10 mm – neck width increment 4 mm = 6 mm. Measure the neck point increment to the left and draw the new neckline using the basic pattern as a template.
Shoulder increment: Place the basic pattern on point 8 parallel to the centre back and mark the endpoint of the shoulder as point 9 in preparation for the shoulder grading.
9–10 Shoulder increment: 4 mm. Measure the shoulder increment to the right. Mark the shoulder dart with the same distance to the neck point as on the basic pattern.
11 Back armhole: Draw the back armhole curve from point 10 to the back armhole notch using the basic pattern as a template. The back armhole notch remains unchanged.
12–13 1⁄2 scye width increment: 7 mm. Trim the sideseams on the front and back pattern by half the scye width increment of 14 mm. Draw the new sideseams using the basic pattern as a template. Mark the intake at the waist at the graded waist point.
14–15 Waist dart calculation: Back width increment 10 mm – scye width increment 7 mm = 3 mm, divided by two = 1.5 mm
Relocate the back waist dart 1.5 mm parallel to the left. The upper dart end point remains at the same level whereas the lower dart endpoint moves down. You can also draw the back waist dart without calculating the increment. Place the basic pattern halfway between the graded sideseam and the graded centre back seam.
Front Pattern
1–2, 3–4 Length increment and waistline relocation same amount as on the back pattern.
5–6 Front waist length increment: 8 mm. Measure the front waist length increment vertically downward from the neck point (see perpendicular guidelines).
6–7 Front neck point: Chest width increment 16 mm – neck width increment 4 mm = 12 mm.
8–9 Chest width increment: 16 mm. Measure this amount from the neckline and the hemline parallel to the centre front.
9–10 Auxiliary point for the neckline: Front waist length – 1⁄2 neck width = 14 mm (measure downward). Make a template for the front neckline (see illustration 2a).
11 Place the neckline template with point 7a on point 7 and turn point 8a to point 10.
Now draw the new neckline.
12–13 Armhole increment: 7.2 mm. Measure downward along the armhole curve.
14 Shoulder width increment: 4 mm. Measure along the shoulder line of the template (see illustration 2a).
5–16 Horizontal bust point: Chest width increment 16 mm – abdomen width 8 mm = 8 mm. The graded bust point is the pivot point for the circular arc over point 7.
17 Placement of the pattern template: Place the shortened shoulder line with point 14 on point 13 and point 7 on the circular arc (= point 17). Draw the shoulder seam.
18 Neck width increment: 4 mm. Relocate the front shoulder piece to the left for a better proportion. Point 18 also marks the position of the right dart legs. Draw a circular arc over point 18 to the left with pivot point 16 (new bust point). The seam transfer makes it possible to draw the new front dart leg relatively parallel to the basic template.
Drawing Template for the Neckline
Close the bust dart on the drawing template.
7–7a Measure 1⁄2 neck width increment 2 mm downward.
8–8a Measure the neck width increment of 4 mm to the right.
Drawing Template for the Bust Dart
A drawing template is optional for grading the pattern two sizes down.
Draw the bust dart: Measure 17–18 and transfer this amount from the neck point to the circular arc (17a-18a).
Draw the front dart leg from point 18 to point 16 (new bust point) using the dart template and complete the bust dart from point 18 to point 16.
Completing the Front Pattern
16 Shift the front waist dart with the graded bust point parallel to the right (chest width increment – abdomen width increment = 8 mm).
19–20 1⁄2 scye width increment: 7 mm. Draw the front sideseam the same way as the back sideseam.
Good study material
Thanks for great article…