

Designer Parka with Hood
Deutsch
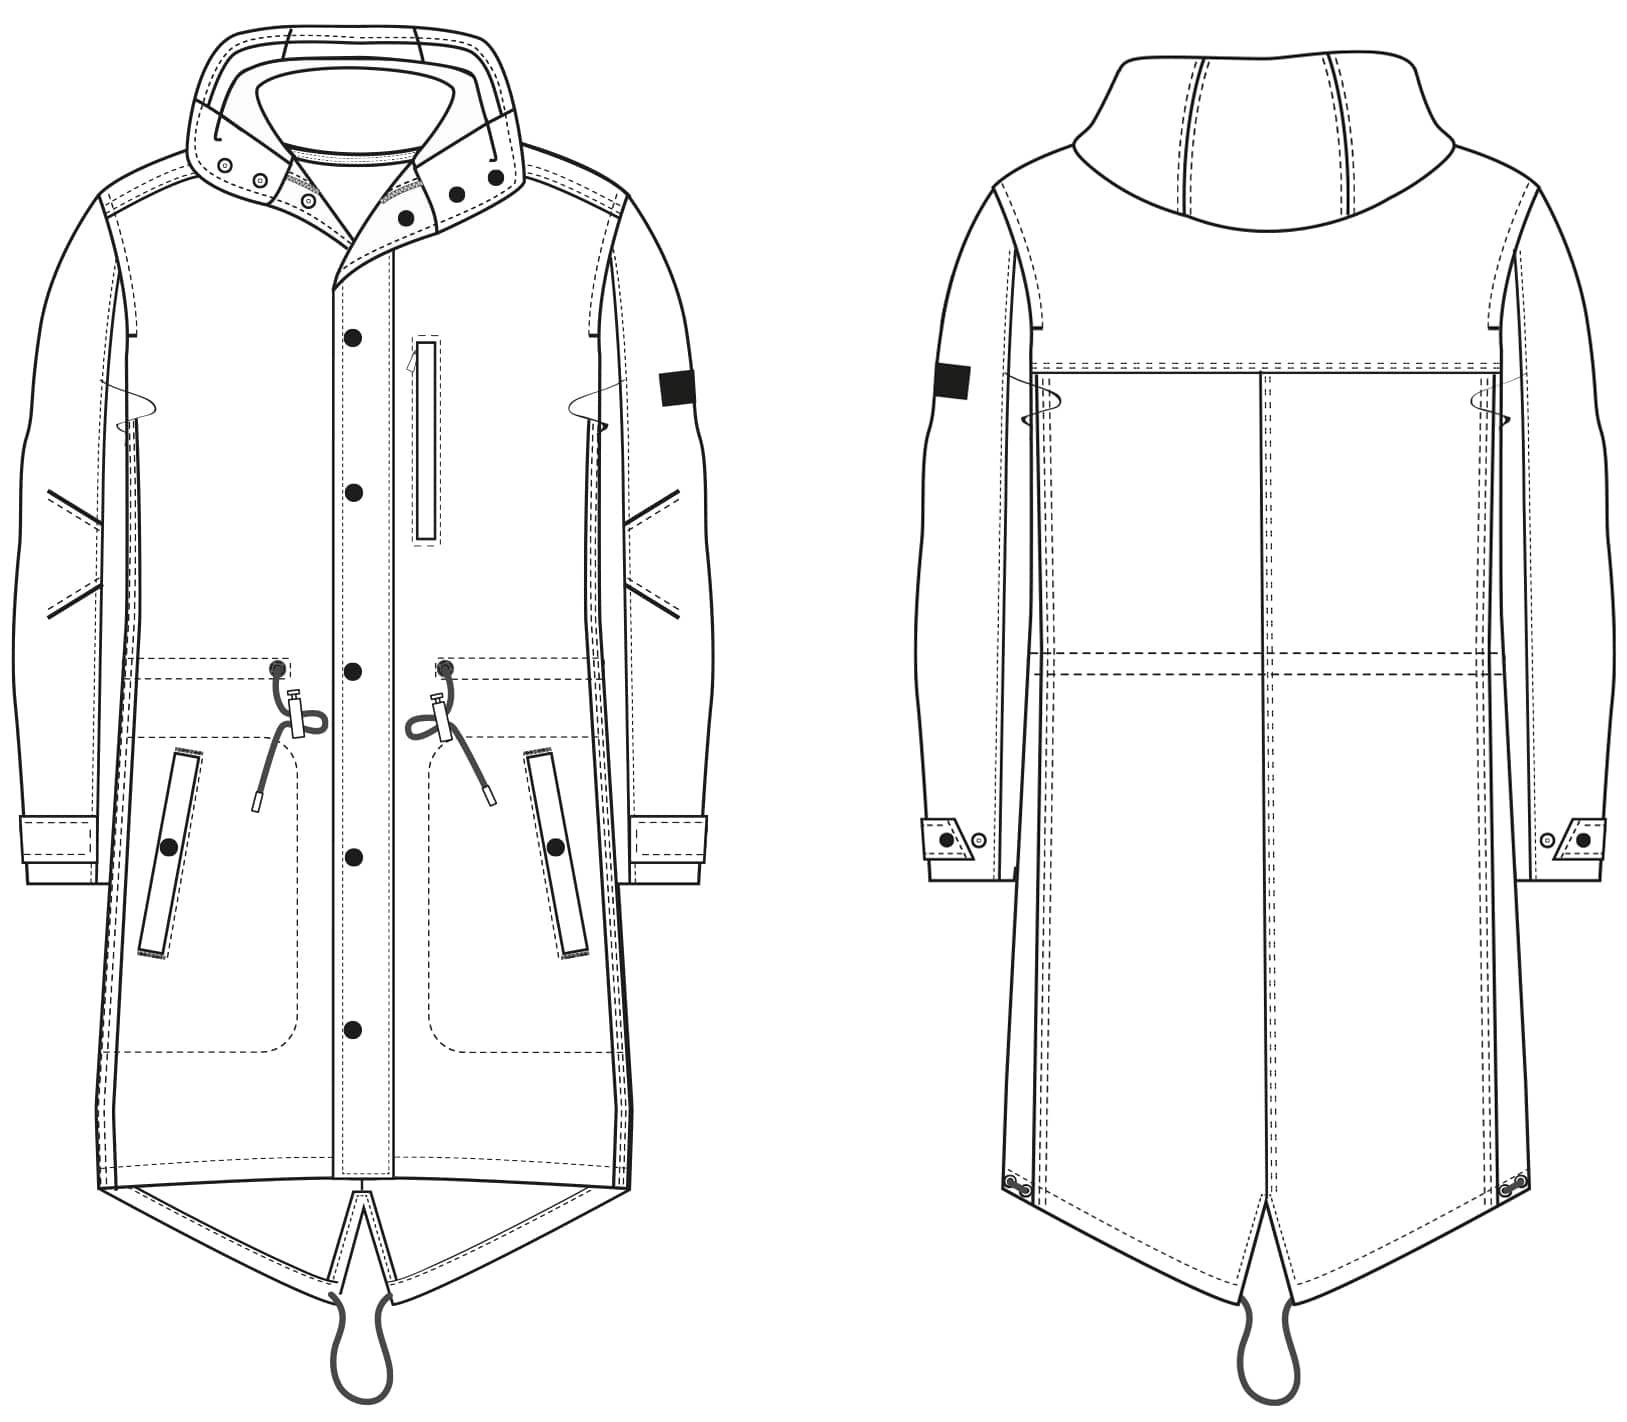
• Drop Hem with Split Back
• Drawstring Cord at Hem and Waist
• Welt Pockets with Snap Buttons
• Chest Pocket with Zipper
• Front Storm Flap with Snap Closure
• Hood with Centre Panel
• Shaped Three-Piece Sleeve
Basic Parka Block
You find the complete pattern construction in our journal Rundschau for men 4-5/2015.
Front and Back Pattern
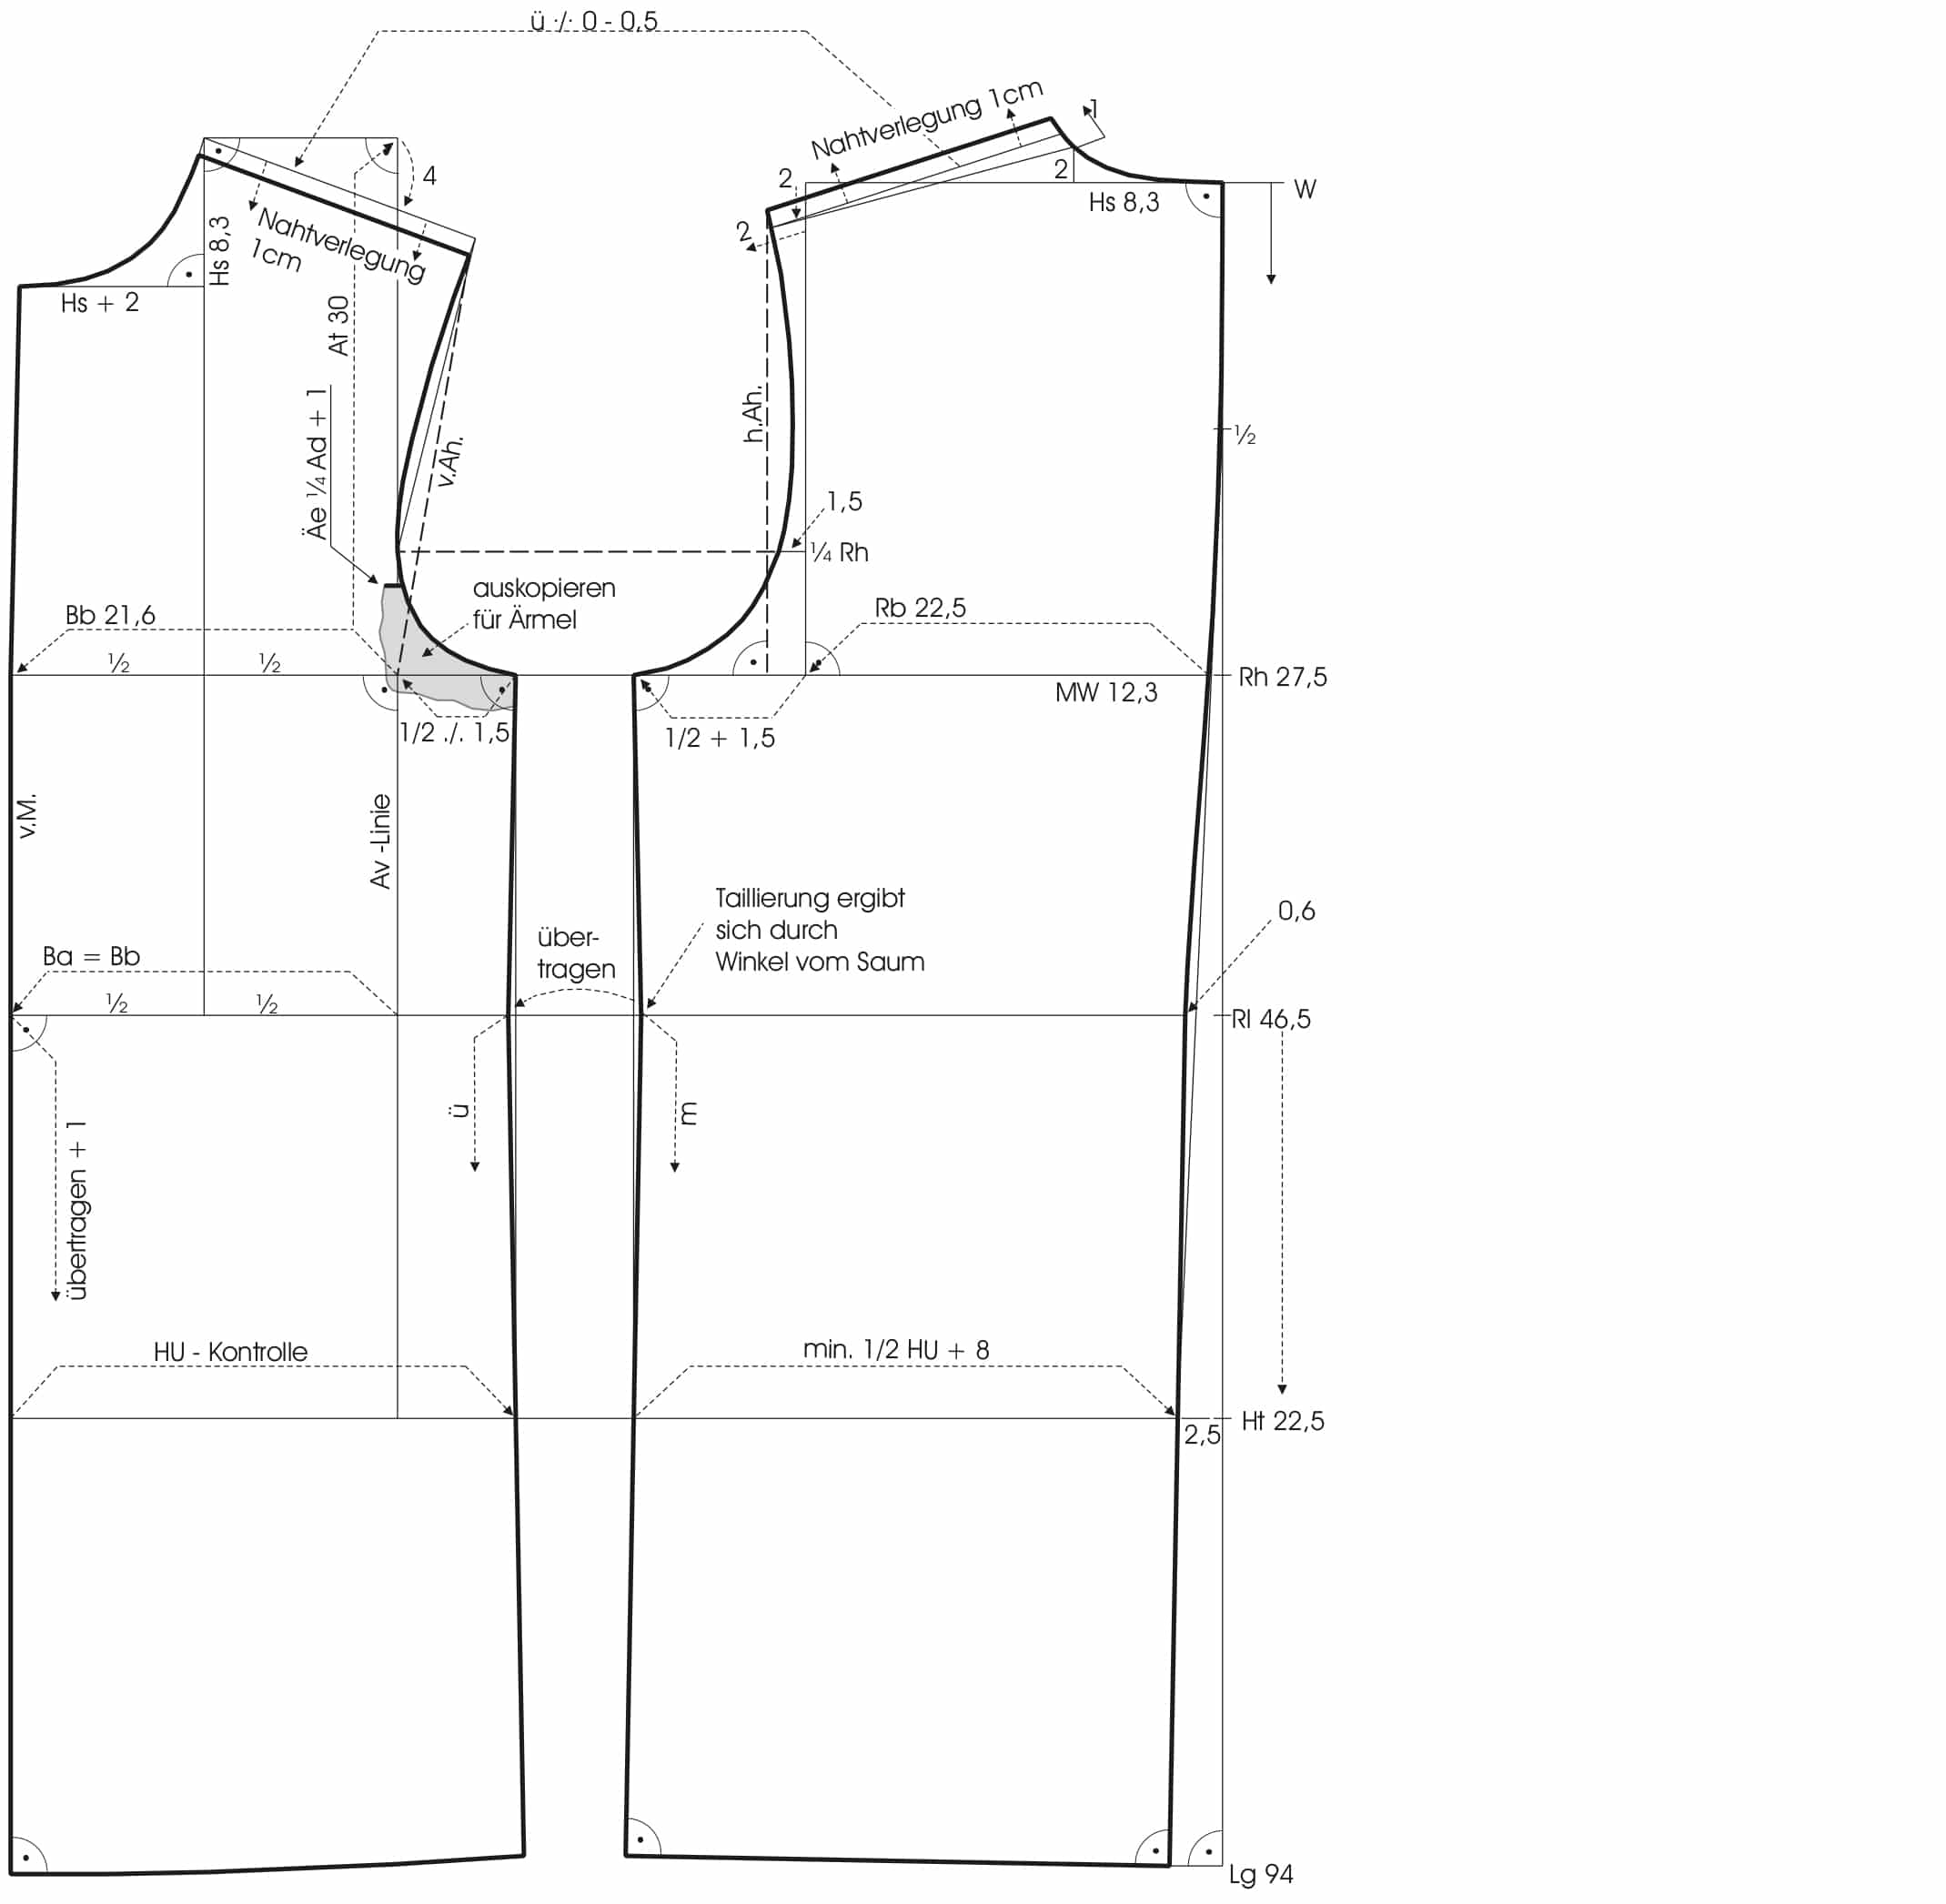
Starting at the neck point (W), measure the scye depth, the back waist length and the length downward on a vertical line. Measure the hip depth from the waist downward and square out to the left from all points. Mark the halfway point at the scye depth. Taper the centre back 2.5 cm at the hip and draw a guideline to the ½-scye depth point. Taper the centre back 0.6 cm at the waist and draw the centre back from the neck point (W) to the hem. Measure the neck width from the neck point (W) to the left and square up 2 cm. Draw the back neckline perpendicular to the centre back and lengthen the neckline1 cm. The neckline should be round and not too flat. On the chest line, measure the back width to the left and square up from this point. Determine the shoulder slope with 2 – 2.5 cm. Draw a guideline to the neckline. For the shoulder width measure 2 cm from the back width to the left and draw the back shoulder line. Measure ¼ back waist length upward at the back width line and square out 1.5 cm.
On the chest line, measure ½ scye width plus 1.5 cm to the left and square down to the hip line. Plot the back armhole as shown. Draw the back hem line perpendicular from the centre back to the left and square up to the intersection of the ½-scye-width-plus-1.5-cm line and the hip line. Extend this line up to the waist for a slightly tapered side seam. Extend the side seam to the armhole. On the chest line, leave a 6-cm gap between the back pattern and the front pattern. Square down from the chest line to the hip line. On the chest line, measure ½ scye width minus 1.5 cm to the left and square up and down for the front pitch line. From the chest line measure the front armhole notch (Äe = ¼ scye width plus 1 cm), ¼ scye depth and the armhole depth upward. On the chest line, measure the chest width from the front pitch line to the left. On the waist line, measure the abdomen width to the left. Divide both distances by two, connect the ½ – points with a straight line, extend this line upward and square right to the armhole depth on the front pitch line. Centre front: Connect the abdomen width with the chest width and extend this line upwards. Square down from the waistline.
Mark the front shoulder slope with 4-4.5 cm on the front pattern. Connect the neck point and the shoulder slope with a guideline, transfer the shoulder width of the back minus 0 – 0.5 cm and plot the front shoulder line. Measure the neck width downward from the neck point for the front neckline. From this point measure the neck width plus 2 cm to the left. Draw the front neckline as shown in the illustration. Complete the centre front from the neck line to the chest width. Transfer the shape and intake of the back side seam to the front side seam. The back side seam is 0.8 cm tapered at the waist due to the perpendicular line at the hem but can be tapered up to 1 cm. Measure the back side seam and transfer the length to the front side seam. Measure the side seam length from the waist to the hem and transfer this amount plus 1 cm to the centre front. Draw the front hem line slightly curved to the side seam. Measure and verify the amount of ease included at the chest, waist and hip line: The chest measurement must comply with the calculation in the measurement chart and half the hip width should include at least 8 cm ease. Cut out all pattern pieces. Compare all seam lengths and examine the transitions at jointed seam lines.
Parka with Hood – Design 4028
Template: Basic Parka Block in Size 94 with One-Piece Sleeve and Lowered Armhole
Design Pattern – Part 2

Separate the front and back yoke pieces and join them together at the shoulder seam. Add the missing width at the front piece parallel to the armhole. Mark the yoke seam line perpendicular to the centre back on the back pattern and draw the new yoke line slightly curved to the armhole. Separate the front side piece from the front pattern and place it on the back side seam. Blend the armhole curve. Shorten the front hem 8 cm parallel to the original hem line. Draw the split back as shown in the illustration. Place the side panel on the back pattern for drawing the back hem line.
Shorten the side panel pattern at the side seam the same amount as the front pattern, draw a guideline to the slit at the back and plot the back hem line nicely curved. Mark the drawcord casing 3 m wide. Trim the centre front around half the Zipper width (here 7 mm). Draw the storm flap 6 cm wide and mark the position centered over the front zipper. Draw the seam linefor the flap 3 cm away from the centre front (half of the flap width). Mark the end of the drawcord casing 2 cm away from the flap seam and mark two eyelets for the drawcord. Plot the vertical chest pocket 3.5 cm away from the flap seam and place the pocket centered over the chest line. Mark the side welt pockets 5 cm below the drawcord casing and plot the welt pockets slightly slanted as shown in the illustration.
Mark the position of the snap button centered on the pocket welt. Draw the stitching line for the pocket bag as shown. Mark the beginning of the zipper 0.5 cm below the neck line and mark the Zipper length with 62 cm. Measure the seam line for the storm flap and plot the pattern piece for the flap 6 cm wide according to the measured seam length. Mark the upper and lower snap button position as shown and space the remaining snap Buttonsevenly. The lower snap button is concealed. Measure the seam length at the front edge and plot the placket facing 2.5 cm wide according to the measured seam length. Mark the grain line on the front pattern perpendicular to the waist line. Mark the fold line on the yoke pattern as the grain line. Mark the grain line on the back pattern parallel to the lower part of the centre back. Mark the grain line parallel to the edge of the storm flap and the front placket.
Sleeve – Part 1
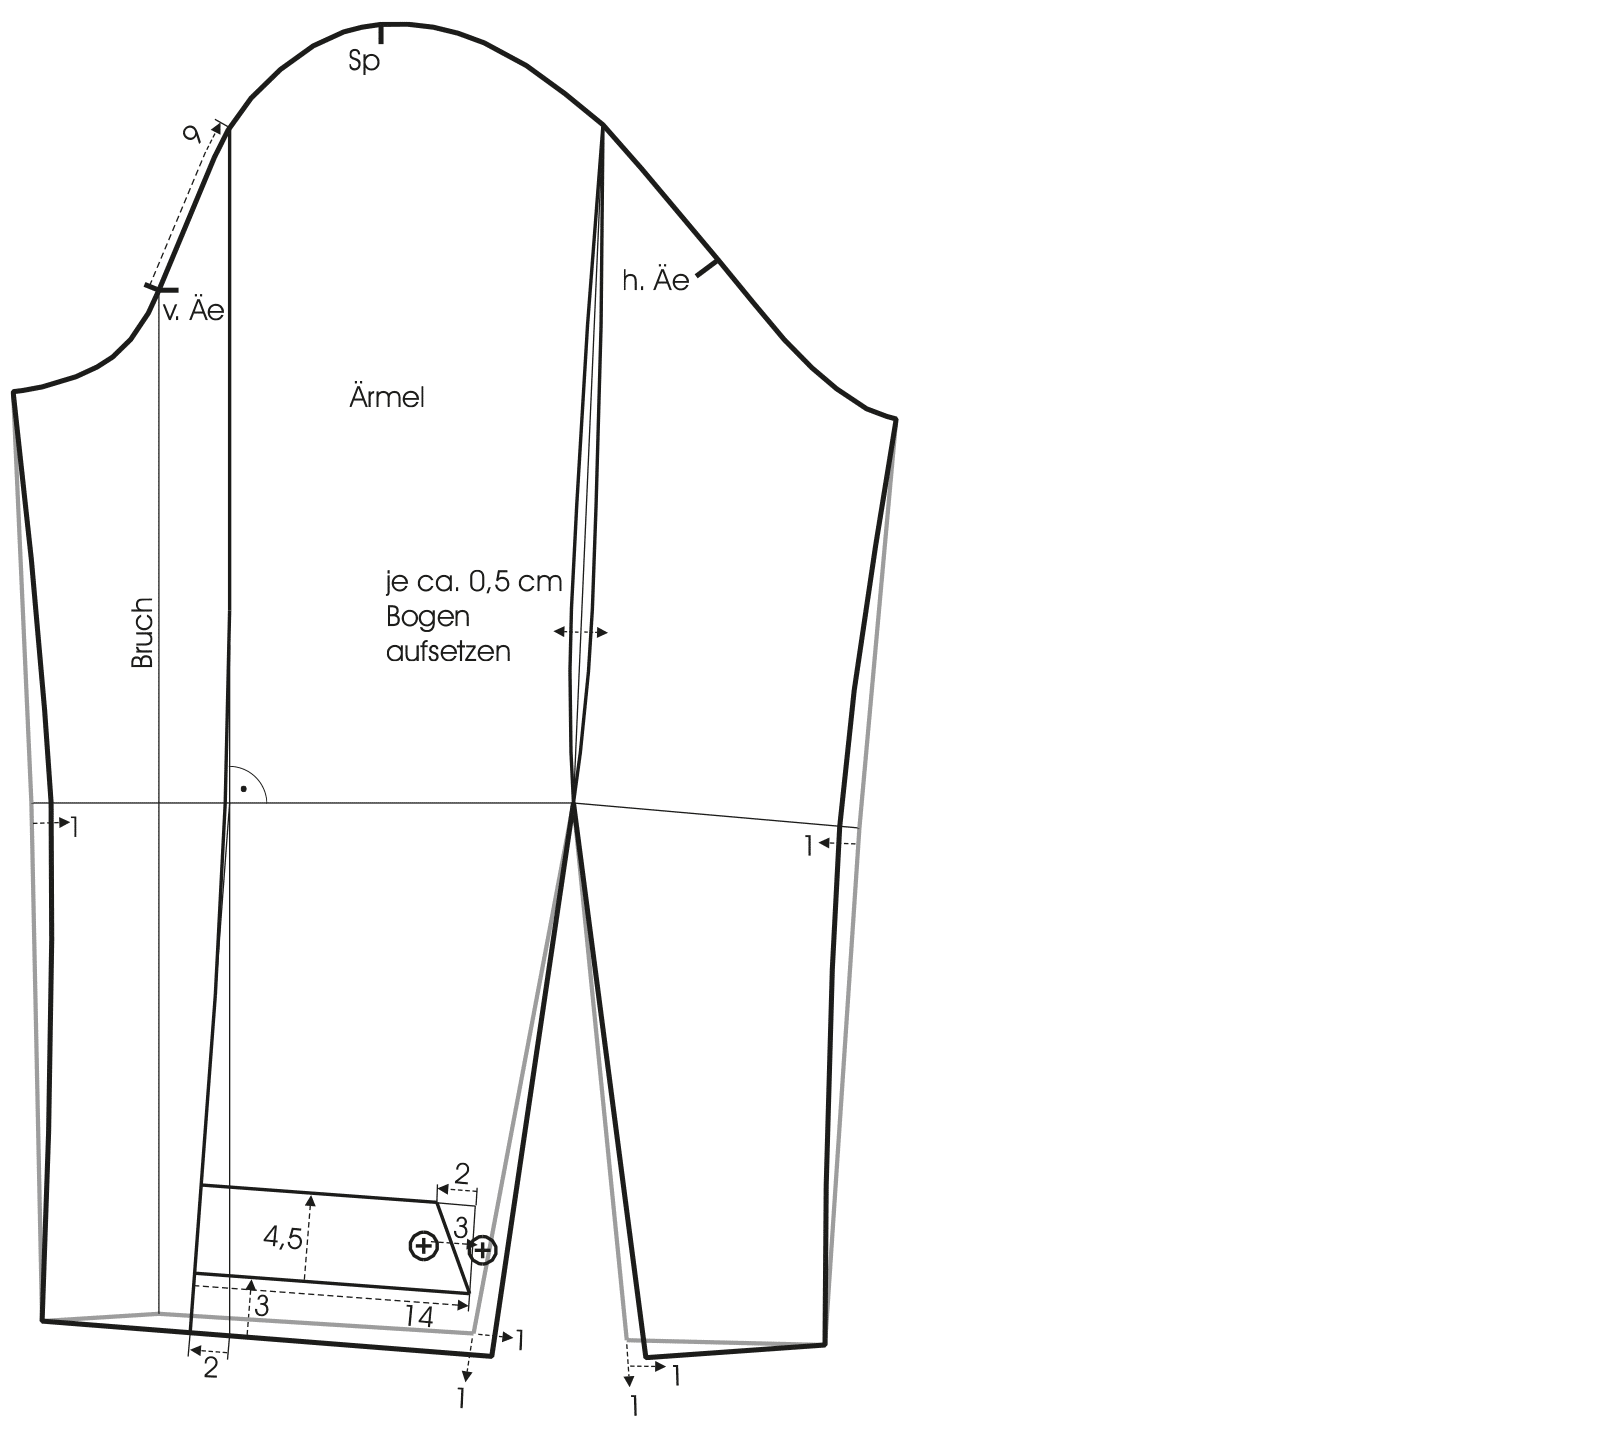
Mark the drawcord casing 3 m wide. Draw the sleeve tab and mark the button positions. Plot the elbow reinforcement. Mark the grain line perpendicular to the elbow line on the upper and under sleeve pattern. Taper the sleeve seams 1 cm at the elbow seam and draw the new sleeve seams. Extend the sleeve length 1 cm at the elbow dart for a better seam transition and draw the hem line straight to the sleeve seams. Shift the dart legs at the hem 1 cm to the back.
Draw the upper sleeve seam nicely curved over the back sleeve fold. Measure 9 cm from the front armhole notch along the sleeve cap line, draw a vertical line downwards and shift the seam 2 cm to the front from the elbow to the hem. Draw the sleeve tab according to the Illustration and mark the positions of the two snaps for adjusting the sleeve tab.
ALI ANSARI — THE CHIEF DESIGNER

From 2000 to 2011, Ansari worked as Managing Director and Artistic Director at the Academy of Fashion Design (AMD) in Munich and then freelanced as Head of Design for several companies, such as Polo Sylt, and recently as Chief Designer at CAMPUS. His previous professional stations include working as Designer at Caren Pfleger Collections 1990 and 1992 and as Designer / Chief Designer for Joop! Womenswear 1994 to 1999. In addition, he has always been working as freelance artist, designer, lecturer and consultant.