Pattern Construction – Dirndl for Kids
Deutsch
It´s shown the basic Dirndl block for a ten-year-old girl. Also you see two other variants. You find the complete article in our professional journal Damen-Rundschau 7/8.2011.
Basic Dirndl Block
Size 146, approx. 10 Years
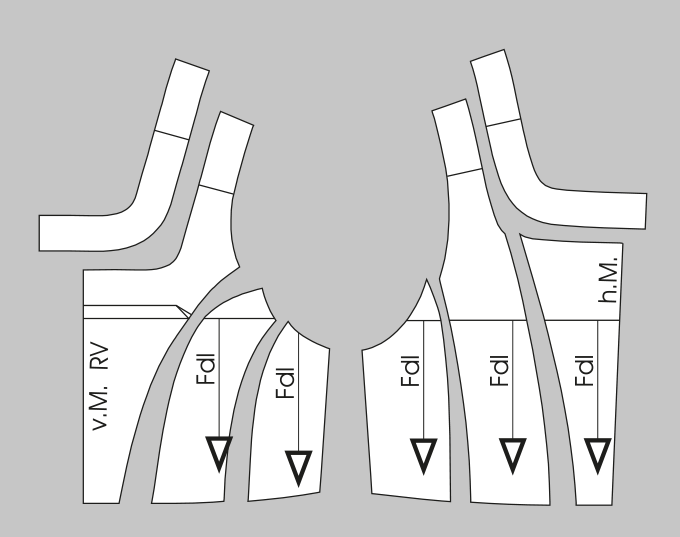
Front and Back Pattern
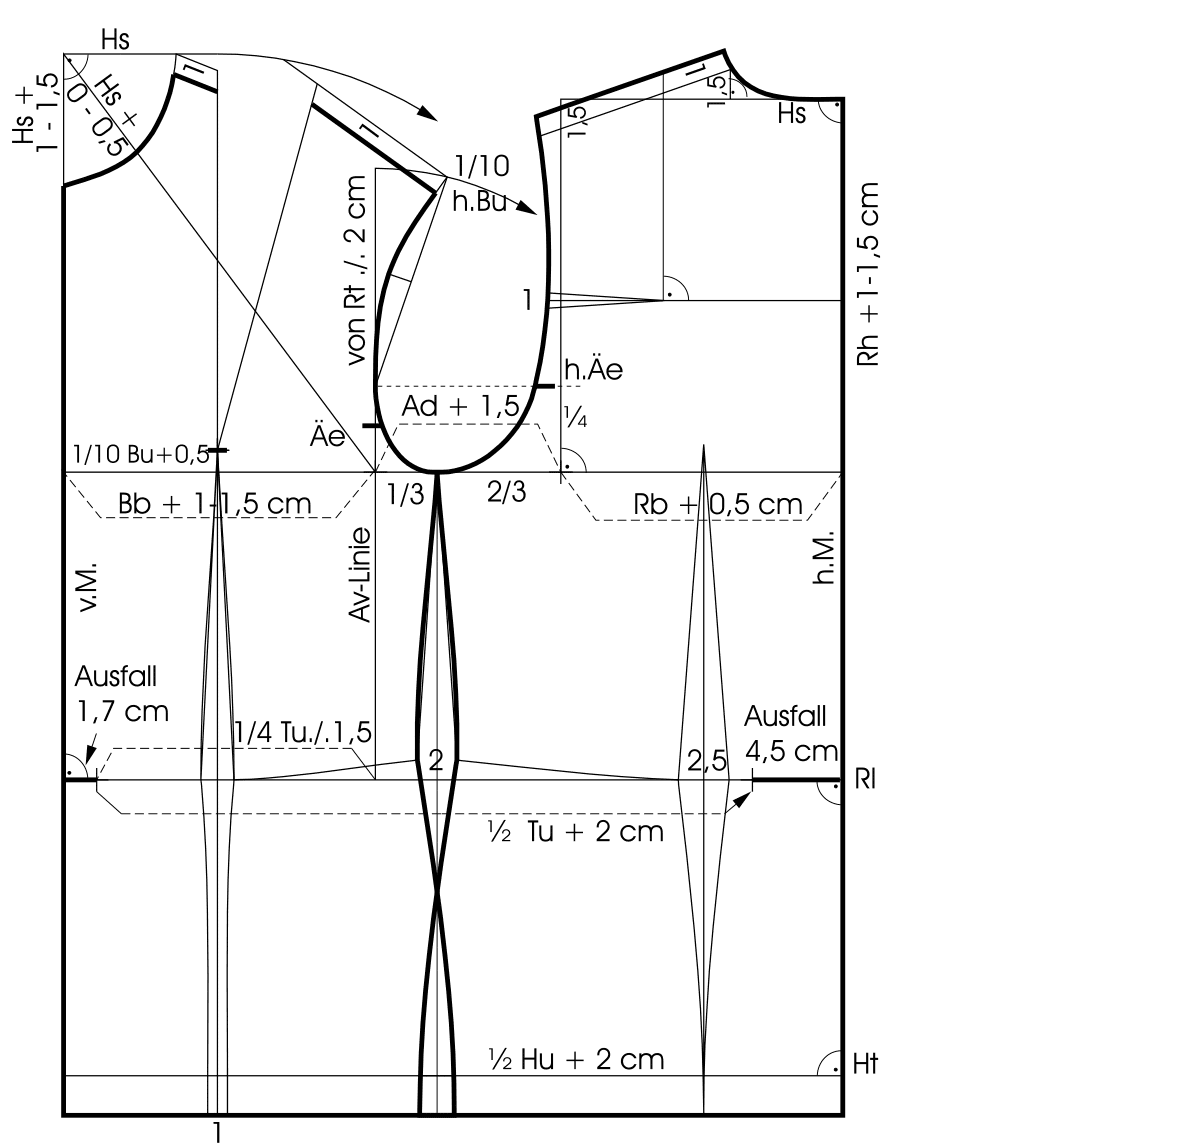
Draft a dress pattern in size 146 as the Basic block for the Dirndl blouses and bodices. Measure the scye depth + ease, the back waist length and the hip depth downward on a vertical line. Square out to the left from all points. On the chestline, measure the back width + ease, the scye width + ease and the chest width + ease to the left. On the chestline, measure 1/10 chest circumference + 0.5 cm from the centre front to the right and square up and down from all points. Draw the back width line upward. Draw the front pitch line upward and downward to the waistline. Measure the neck width from the neck point to the left. Square up 1.5 cm and draw the back neckline. On the back width line, measure 1.5 cm downward for the shoulder slope. Draw the shoulder line. From the chestline, measure ¼ of the back waist length upward on the back width line and square out 1.3 cm to the left for the back armhole notch. From the chestline, measure the armhole depth (same as back pattern minus 2 cm) upward on the front pitch line.
From the waistline, measure the front length II upward and from this point the bust depth II downward. Draw an arc from the waistline and from the chestline to the right. For the position of the front shoulder seam, measure 1/10 of ½ chest circumference from the front pitch line along the arc. From this point measure the shoulder width toward the front arc. Plot the armhole according to the illustration. Draw a perpendicular line from the front length to the centre front for the front neckline. From the centre front, measure the neck width to the right and the neck width + 1 cm downward. Measure the left piece of the front shoulder seam to determine the position of the Right bust dart leg. Measure the right dart leg and Transfer this length to the left bust dart leg. On the waistline, measure ¼ of the waist circumference minus 1.5 cm from the front pitch line to the left. From this point measure ½ waist circumference + 2 to 3 cm to the right.
Measure the back intake and taper the side seam and the back waist dart accordingly. Transfer the intake at the centre front to the front waist dart. On the hipline, measure ½ hip circumference + 2 cm from the centre front to the right. Add the missing width equally to each side seam at the hip. Draw the hip curve as illustrated. Use this basic block as a template for the following Dirndl blouses. Construct a similar dress pattern with reduced ease additions for the Dirndl bodices. Draft a matching one-piece sleeve in size 146 for the blouses.
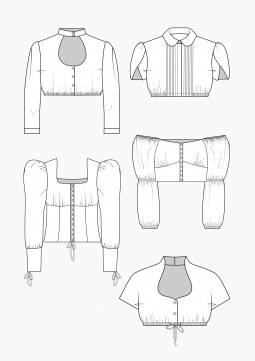
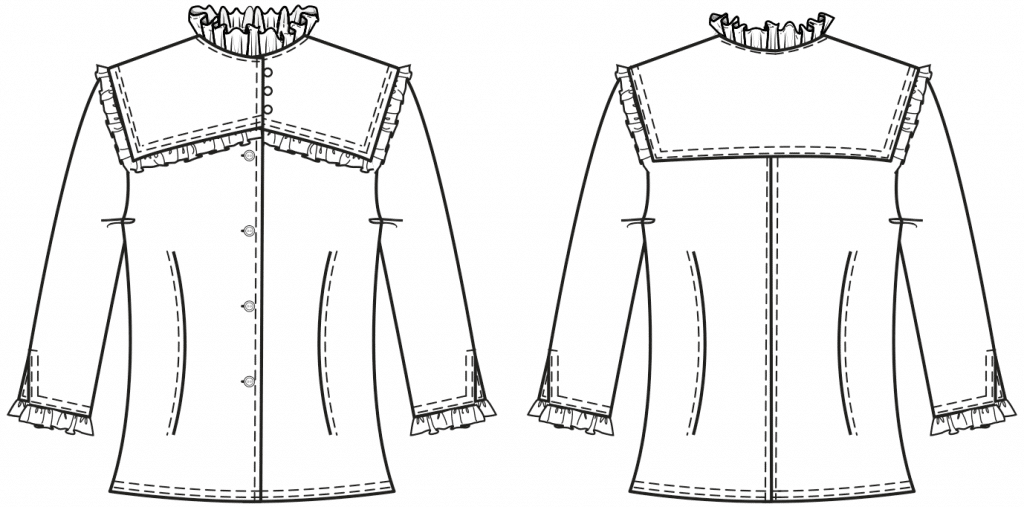
“Werdenfelser-Tracht” with short Skirt
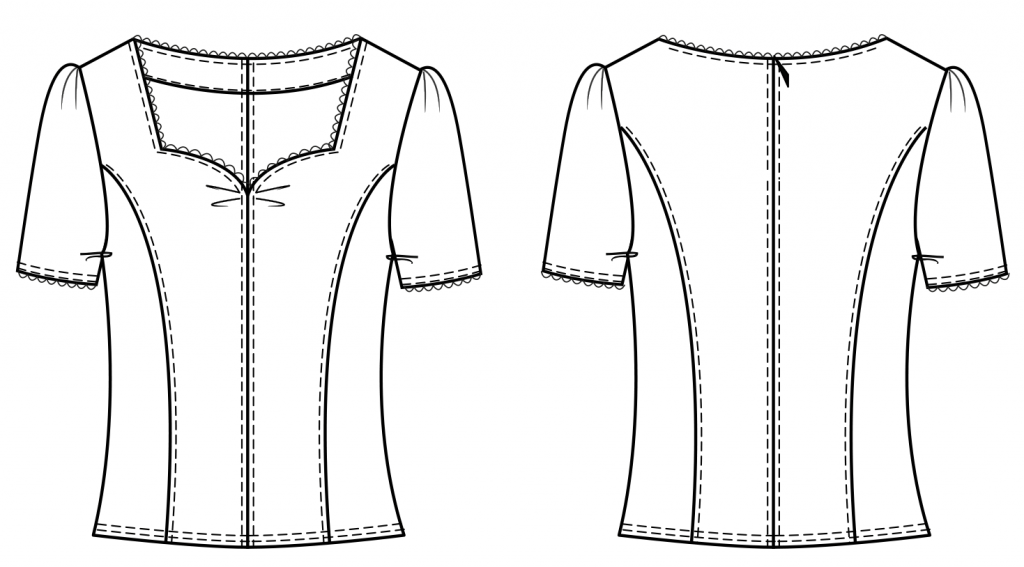
Laced Bodice and Blouse with Square Neckline in Size 146, approx. 10 Years
 (Photo Credit: Technical Drawing S. Lindner)
Use a basic Dirndl block in size 146 (size 10) as a template. Trace a copy of the front and back pattern up to the hipline. Relocate the bust dart to the centre front. Trim the shoulder 1 cm and draw the new armhole on the front and back pattern. Mark the shoulder seam 6 cm wide. Lower the neckline 10 cm at the centre front.
Plot the square neckline as shown in the illustration. Lower the neckline 2 cm at the centre back and draw the back neckline perpendicular to the centre back. Draw the princess seam lines on the front and back pattern as illustrated. Taper the back princess seam 1.5 cm at the waist. Mark 0.7 cm intake at the back armhole for a better fit. Sew the zipper into the centre back seam.
Sleeve
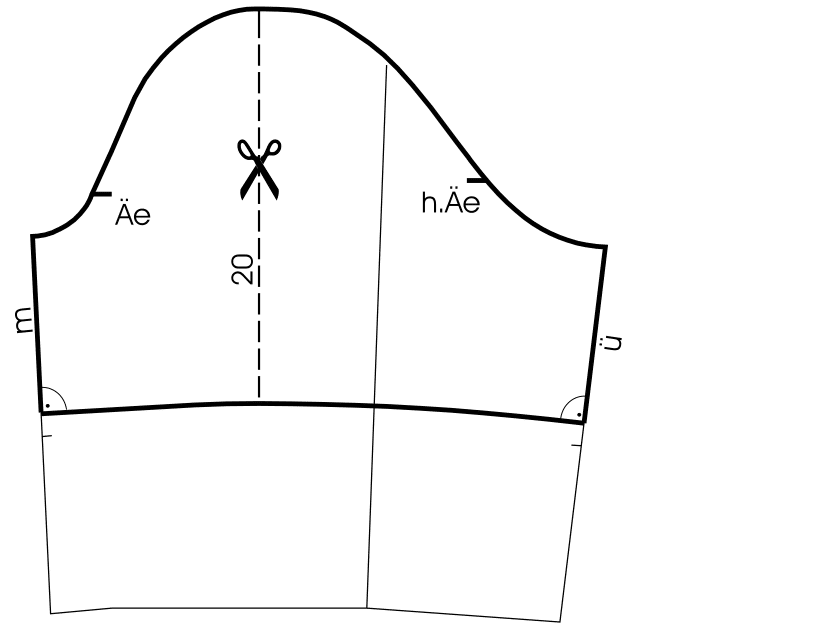 Use a basic one-piece sleeve in size 146 as a template. Copy the sleeve pattern up to the elbow line. Measure 20 cm downward from the sleeve cap for the sleeve length. Draw the sleeve hem curve perpendicular to the front sleeve seam. Measure the front seam length and transfer this length to the back sleeve seam. Complete the sleeve hem as illustrated. Mark the sleeve centre line as cutting line for extending and raising the sleeve cap.
Finished Pattern Pieces

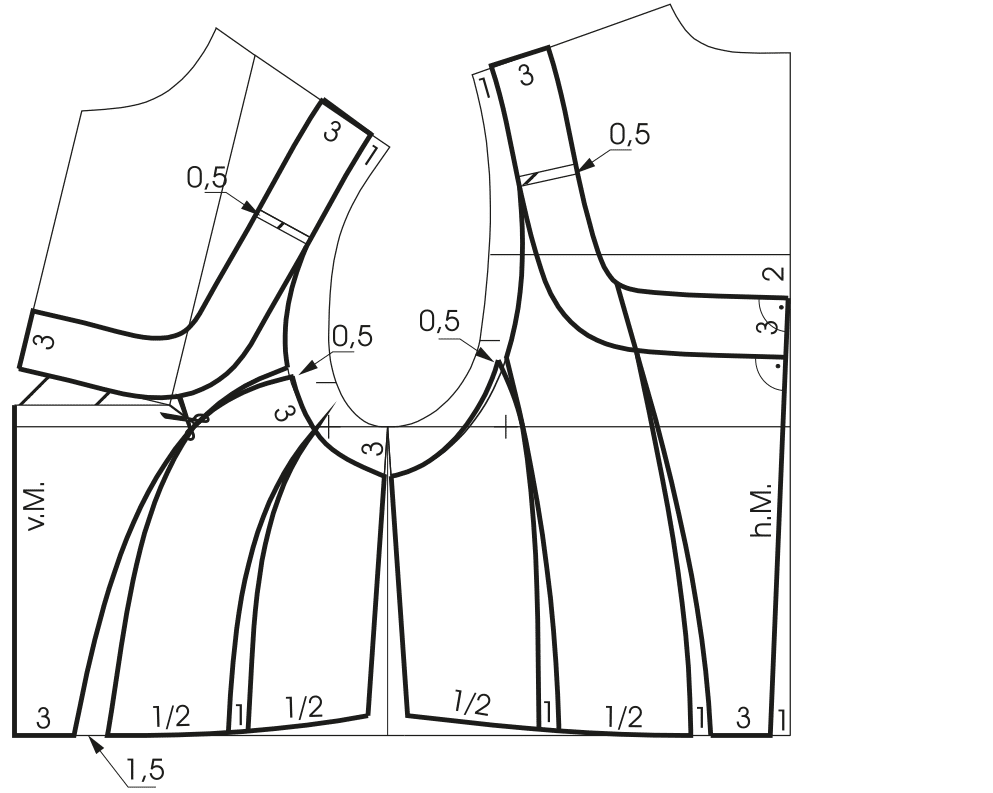
Separate all pattern pieces and complete all overlapping sections. Mark the bust dart at the centre front as gathers. Cut through the sleeve pattern from the sleeve cap to the hem. Spread and raise the sleeve cap as shown in the illustration. Draw the new sleeve cap line. Sew the zipper into the centre back seam. Blend all seam lines. Mark the grainlines.
 (Photo Credit: Technical Drawing S. Lindner)
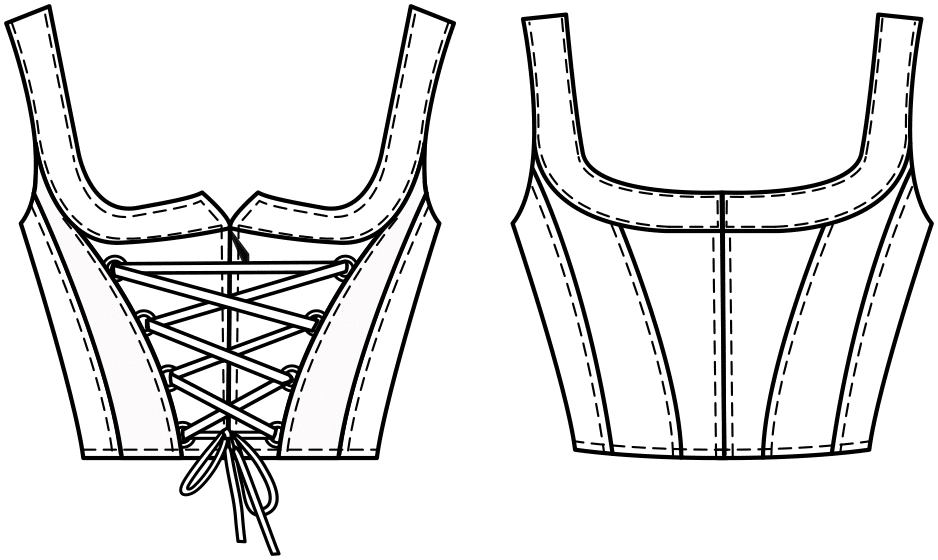
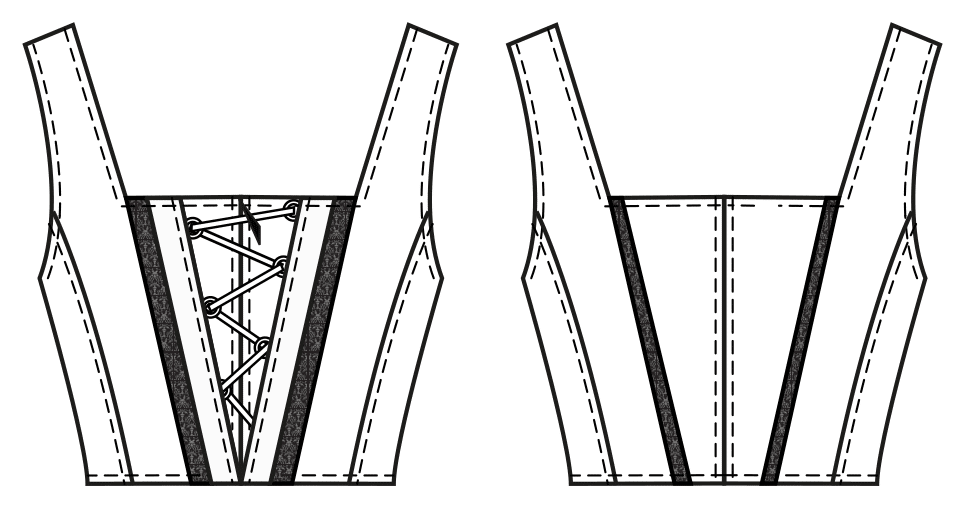
Bodice Front and Back Pattern
Use the basic Dirndl block with reduced ease additions in size 146 as a template (see measurement chart). Relocate the bust dart temporarily to the centre front. Trim the shoulder 1 cm and lower the armhole 3 cm. Draw the new armhole on the front and back pattern. Mark the shoulder straps 3 cm wide. Draw the 3-cm wide neckline band perpendicular to the centre front and centre back as shown in the illustration. Plot the stylelines as illustrated. Mark pinching amounts for contouring at the armhole and at the shoulder straps. Mark a short cutting line from the bust dart to the front styleline. The finished width at the waistline amounts to ½ waist circumference + 0 to 0.5 cm. Sew the zipper into the centre front seam.
Finished Pattern Pieces
Separate all pattern pieces. Cut through the front pattern from the styleline to the bust Point and close the bust dart. Copy the pattern pieces for the neckline band and close the pinching amounts. Close all pinching amounts on the front and back pattern. Sew a zipper into the centre front seam. Blend all seam lines. Mark the grainlines.
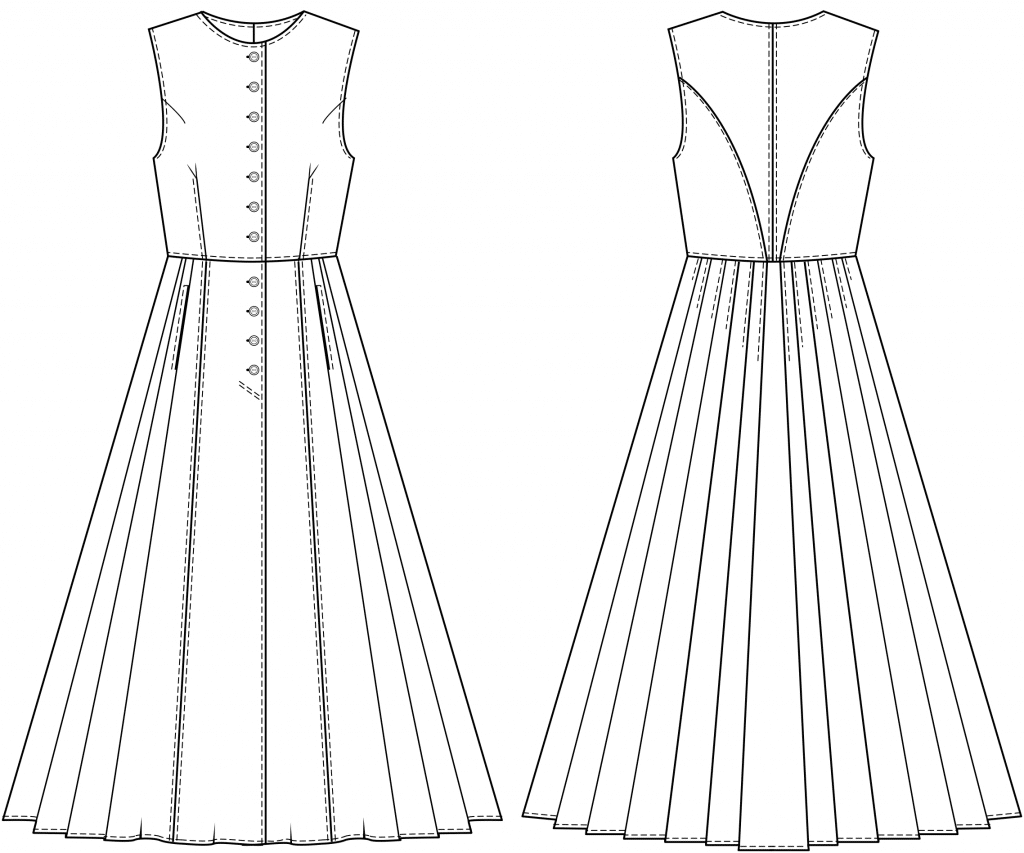
Flared Half-Circle Skirt
For the Dirndl skirt construct a flared half-circle skirt with gathered width at the waist. Measure the waist circumference on a vertical line downward and mark the waistline position of the flared halfcircle skirt. Measure the skirt length with 48 cm from the waistline downward and mark the hem. Now draw an arc with pivot point at the starting point over the waistline and over the hem. Use a waist tape measure with a pencil as a circle.
Draw a half circle. Verify the width at the waist. This should be approximately three times the waist circumference. The short skirt for the “Werdenfelser-Tracht” is finished with waistband casing and elastic. The width at the waist is gathered to match the waist circumference. Draft a long half-circle skirt for the following variation of the “Werdenfelser-Tracht” with 65 cm finished skirt length.
“Werdenfelser-Tracht” with long Skirt
Laced Bodice and Blouse with Lace Collar in Size 146, approx. 10 Years
 (Photo Credit: Technical Drawing S. Lindner)
 (Photo Credit: Technical Drawing S. Lindner)
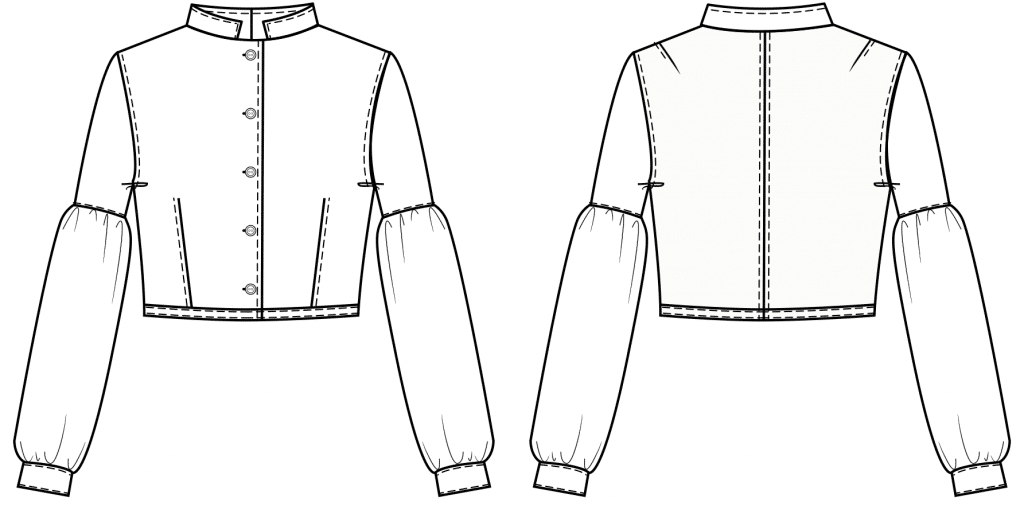
“Silesian Tracht”
High-necked Dirndl and Long-sleeve Blouse in Size 146, approx. 10 Years
 (Photo Credit: Technical Drawing S. Lindner)
 (Photo Credit: Technical Drawing S. Lindner)